

How to profile JVM workloads in Kubernetes without custom app images
Use Cryostat, Quarkus, and minikube to validate an operator-driven JFR workflow before you roll profiling access into a real platform.

A JVM in Kubernetes is still a JVM. The messy part is everything wrapped around it.
On a laptop, I can run jcmd, open JDK Mission Control, and usually get an answer before the coffee cools. In a cluster, that same JVM is now behind pods, services, ingress, TLS, and whatever naming scheme the team picked six months ago. Opening ad hoc management ports just to answer one performance question is the kind of shortcut that feels clever right up until someone asks you to keep it.
JDK Flight Recorder is still one of the best tools we have for understanding what a JVM is doing under load. The awkward part is reaching the target cleanly once that JVM lives inside Kubernetes. Cryostat solves that part inside the cluster: it discovers Java workloads, captures recordings, runs automated analysis, and gives you dashboards without asking every application image to grow its own profiling story.
That is the path I want here. We are going to keep the app boring and make the workflow useful.
What we build
When we are done, you will have a small Quarkus HTTP service running on minikube, a Cryostat installation in its own namespace, and Operator-driven agent autoconfiguration on the application pod. We will hit a noisy endpoint, capture a JFR recording, run automated analysis, and add a couple of dashboard cards so the whole path is visible end to end.
I am keeping this in JVM mode on purpose. Quarkus native executables can emit JFR data, but the flow below depends on Operator-injected -javaagent, so a regular JVM deployment is the right fit.
What you need
You need a recent minikube, enough RAM to run more than one serious pod, and a little tolerance for local Kubernetes friction. Cryostat 4.1 supports Kubernetes 1.29+ and minikube still marks the Podman driver as experimental, so this is a practical local setup, not a promise that every step will feel graceful. The commands below pin Quarkus 3.35.2, cert-manager v1.20.2, and OLM v0.38.0, and they assume a Cryostat 4.1.x install on a recent minikube release. If you run this later, recheck Cryostat, cert-manager, minikube, and OLM before you start pasting commands.
JDK 21 or newer
Podman
minikube
kubectlcurljqBasic Kubernetes familiarity
A LOT of ☕️
At least 8 GiB RAM for the minikube node
I pin Quarkus 3.35.2 here because the May 4, 2026 Quarkus security release patched all supported streams and made a lot of older version numbers instantly look less charming.
If you are on macOS or Windows, give the Podman machine more than 8 GiB before you start minikube. Podman configures machine memory in MiB, so 10240 gives you 10 GiB:
podman machine init --cpus 4 --memory 10240 --disk-size 30
podman machine set --rootful
podman machine start
podman info --format '{{.Host.Security.Rootless}}'
If you already have a tiny default machine, make sure to run it in rootful mode, otherwise networking is going to break. minikube, Cryostat, and an image build all competing inside one cramped VM is a boring way to lose half an afternoon.
Create the app
Create the project or use my demo repository.
mvn io.quarkus.platform:quarkus-maven-plugin:3.35.2:create \
  -DprojectGroupId=dev.mainthread \
  -DprojectArtifactId=cryostat-demo \
  -DclassName="dev.mainthread.GreetingResource" \
  -Dpath="/hello" \
  -Dextensions="rest,quarkus-jfr"

cd cryostat-demo
Those two extensions do all the work we need:
restgives us a tiny HTTP surface to hit under loadquarkus-jfradds Quarkus-specific JFR events, which is exactly what the Quarkus JFR guide is for and what Cryostat understands well
Replace src/main/java/dev/mainthread/GreetingResource.java:
package dev.mainthread;

import java.util.ArrayList;
import java.util.List;

import jakarta.ws.rs.GET;
import jakarta.ws.rs.Path;
import jakarta.ws.rs.Produces;
import jakarta.ws.rs.core.MediaType;

@Path("/hello")
public class GreetingResource {

    @GET
    @Produces(MediaType.TEXT_PLAIN)
    public String hello() {
        return "Hello from Quarkus " + System.getProperty("java.version");
    }

    @GET
    @Path("/work")
    @Produces(MediaType.TEXT_PLAIN)
    public String doWork() {
        List<String> values = new ArrayList<>(500_000);
        long result = 0;

        for (int i = 0; i < 500_000; i++) {
            String value = "value-" + i;
            values.add(value);
            result += value.length();
        }

        return "Computed: " + result + ", allocated strings: " + values.size();
    }
}
/hello/work is wasteful on purpose. We want obvious allocation and CPU signal so the recording tells us something at a glance. This is a flashlight, not a benchmark.
Set src/main/resources/application.properties:
quarkus.application.name=cryostat-demo
quarkus.http.host=0.0.0.0
quarkus.http.host=0.0.0.0 matters because a container that binds only to loopback is a very efficient way to create a healthy-looking pod that no Service can actually use.
Build the image and cluster
Package the app:
./mvnw package -DskipTestsStart minikube with Podman and containerd:
minikube start -p cryostat-lab \
  --driver=podman \
  --container-runtime=containerd \
  --cpus=4 \
  --memory=8192
I am keeping containerd here because minikube’s image commands can talk straight to the runtime and load the image into the same storage Kubernetes uses.
Switch both kubectl and minikube to the cryostat-lab profile.
kubectl config use-context cryostat-lab
minikube profile cryostat-lab
Build the image directly into minikube:
minikube image build -t cryostat-demo:1.0 -f src/main/docker/Dockerfile.jvm .This is the path I prefer here. minikube image build builds against the cluster runtime directly, so there is no registry addon to expose, no dynamic host port to discover, and no Podman-machine localhost trap waiting in the weeds. Because the generated Quarkus JVM Dockerfile expects the packaged application under target/quarkus-app, the ./mvnw package -DskipTests step above still matters.
Install Cryostat
First install cert-manager. Cryostat’s getting-started guide still requires cert-manager v1.13.6+, and upstream is very clear that disabling it is not the normal path unless you already have another answer for encrypted traffic.
kubectl apply -f https://github.com/cert-manager/cert-manager/releases/download/v1.20.2/cert-manager.yaml
kubectl wait --namespace cert-manager \
  --for=condition=Available deployment \
  --all \
  --timeout=180s
After that, install OLM. I prefer pinning this instead of pulling latest, because moving targets are exciting in all the wrong ways when you are writing a tutorial.
kubectl create -f https://github.com/operator-framework/operator-lifecycle-manager/releases/download/v0.38.0/crds.yaml
kubectl create -f https://github.com/operator-framework/operator-lifecycle-manager/releases/download/v0.38.0/olm.yaml
kubectl get pods -n olm
Wait until all containers say “Running”.
Then install the Cryostat Operator from OperatorHub:
kubectl create -f https://operatorhub.io/install/cryostat-operator.yaml
kubectl get csv -A | grep -i cryostat
Give this a minute to get ready. Check:
kubectl describe subscription my-cryostat-operator -n operatorsDeploy Cryostat and the app
Create a directory for the manifests, then create the namespaces:
mkdir -p kubernetes
kubectl create namespace cryostat
kubectl create namespace demo-apps
Create kubernetes/cryostat.yaml:
apiVersion: operator.cryostat.io/v1beta2
kind: Cryostat
metadata:
  name: cryostat-sample
  namespace: cryostat
spec:
  enableCertManager: true
  targetNamespaces:
    - demo-apps
  storageOptions:
    emptyDir:
      enabled: true
  reportOptions:
    replicas: 0
  networkOptions:
    coreConfig:
      annotations:
        nginx.ingress.kubernetes.io/backend-protocol: "HTTPS"
      ingressSpec:
        tls:
          - {}
        rules:
          - host: cryostat.local
            http:
              paths:
                - path: /
                  pathType: Prefix
                  backend:
                    service:
                      name: cryostat-sample
                      port:
                        number: 4180
targetNamespaces is the important bit here. As the Cryostat configuration docs explain, if you omit it then the instance only sees workloads in its own namespace, which is great for isolation and not very helpful for this demo. I also keep storage on emptyDir and set reportOptions.replicas: 0 because this is a local lab and Cryostat is already carrying enough weight for one minikube node.
Create kubernetes/cryostat-demo.yaml:
apiVersion: apps/v1
kind: Deployment
metadata:
  name: cryostat-demo
  namespace: demo-apps
spec:
  replicas: 1
  selector:
    matchLabels:
      app: cryostat-demo
  template:
    metadata:
      labels:
        app: cryostat-demo
        cryostat.io/name: cryostat-sample
        cryostat.io/namespace: cryostat
    spec:
      containers:
        - name: cryostat-demo
          image: cryostat-demo:1.0
          imagePullPolicy: IfNotPresent
          ports:
            - name: http
              containerPort: 8080
---
apiVersion: v1
kind: Service
metadata:
  name: cryostat-demo
  namespace: demo-apps
spec:
  selector:
    app: cryostat-demo
  ports:
    - name: http
      port: 8080
      targetPort: 8080
Those two cryostat.io/* labels are the handoff. Cryostat’s agent autoconfiguration path uses them to find the right Cryostat instance, verify namespace access, and inject the agent settings into the workload.
I keep imagePullPolicy: IfNotPresent because the image already lives inside minikube. If you rebuild the same cryostat-demo:1.0 tag during the walkthrough, delete the pod or bump the tag before you expect Kubernetes to pick up the new bits.
Apply the manifests and wait:
kubectl apply -f kubernetes/cryostat.yaml
kubectl get pods -n cryostat -w
kubectl apply -f kubernetes/cryostat-demo.yaml
kubectl wait --namespace demo-apps \
  --for=condition=ready pod \
  --selector=app=cryostat-demo \
  --timeout=180s
Verify the path before recording
Port-forward the app. I have not used an ingress here because I could not get this to work on my mac. If you can, let me know what I am missing:
kubectl port-forward -n demo-apps svc/cryostat-demo 8080:8080In another terminal, hit both endpoints:
curl -s http://localhost:8080/hello
curl -s http://localhost:8080/hello/work
You should see output like this:
Hello from Quarkus <java-version>
Computed: 5888890, allocated strings: 500000
Now confirm that the Operator really injected the agent:
POD_NAME=$(kubectl get pods -n demo-apps -l app=cryostat-demo -o jsonpath='{.items[0].metadata.name}')
kubectl exec -n demo-apps "$POD_NAME" -- printenv JAVA_TOOL_OPTIONS
You want to see -javaagent inside JAVA_TOOL_OPTIONS. If it is missing, stop there and fix that first. Everything after this depends on it.
Open another terminal and port-forward the Cryostat target API:
kubectl port-forward -n cryostat svc/cryostat-sample 8181:4180Check the Cryostat target API:
curl -sk https://localhost:8181/api/v4/targets | jq .Use /api/v4. Cryostat 4 removed the older /api/v1 through /api/v3 prefixes, and old snippets have a bad habit of hanging around in search results long after they should have retired.
If target discovery fails, check targetNamespaces first, then the two workload labels, then whether minikube image build completed successfully and the Deployment image name still matches cryostat-demo:1.0. Most failures here are wiring problems, not JVM problems.
Capture a recording
Cryostat needs an event template (a .jfc file) before it will start a recording. On a fresh lab instance the template picker is sometimes empty, because nothing has been uploaded yet and the server may not list presets the way you expect. Pull the stock templates from the same JVM your app runs on, register them in Cryostat once, then record.
Download templates from the app pod
If you don’t see the default templates in the web UI, you can download them and install them manually.
Pick the pod (default container is fine; ignore Defaulted container hints from kubectl):
APP_POD=$(kubectl get pods -n demo-apps -l app=cryostat-demo -o jsonpath='{.items[0].metadata.name}')
kubectl exec -n demo-apps "$APP_POD" -- find /usr/lib/jvm -path '*/lib/jfr/*.jfc' 2>/dev/null
Copy Profiling and optionally default to your machine (tar: Removing leading '/'... from kubectl cp is harmless):
PROFILE_JFC=$(kubectl exec -n demo-apps "$APP_POD" -- find /usr/lib/jvm -name profile.jfc -path '*/lib/jfr/*' 2>/dev/null | head -1)
DEFAULT_JFC=$(kubectl exec -n demo-apps "$APP_POD" -- find /usr/lib/jvm -name default.jfc -path '*/lib/jfr/*' 2>/dev/null | head -1)
kubectl cp "demo-apps/$APP_POD:$PROFILE_JFC" ./cryostat-profile.jfc
kubectl cp "demo-apps/$APP_POD:$DEFAULT_JFC" ./cryostat-default.jfc
If find returns nothing, your image may put JFR configs elsewhere — use the paths from the first find command in this subsection and copy those files instead.
Install them in Cryostat
With the Cryostat UI available (for example https://localhost:8181) from the port-forward you already set up), open the area for event templates, upload cryostat-profile.jfc, and upload cryostat-default.jfc if you want a lighter preset in the list. After that, the recording wizard should let you select the uploaded template by name.
Generate load and record
Keep the app port-forward running and generate a steady stream of requests:
while true; do
  curl -s http://localhost:8080/hello/work > /dev/null
done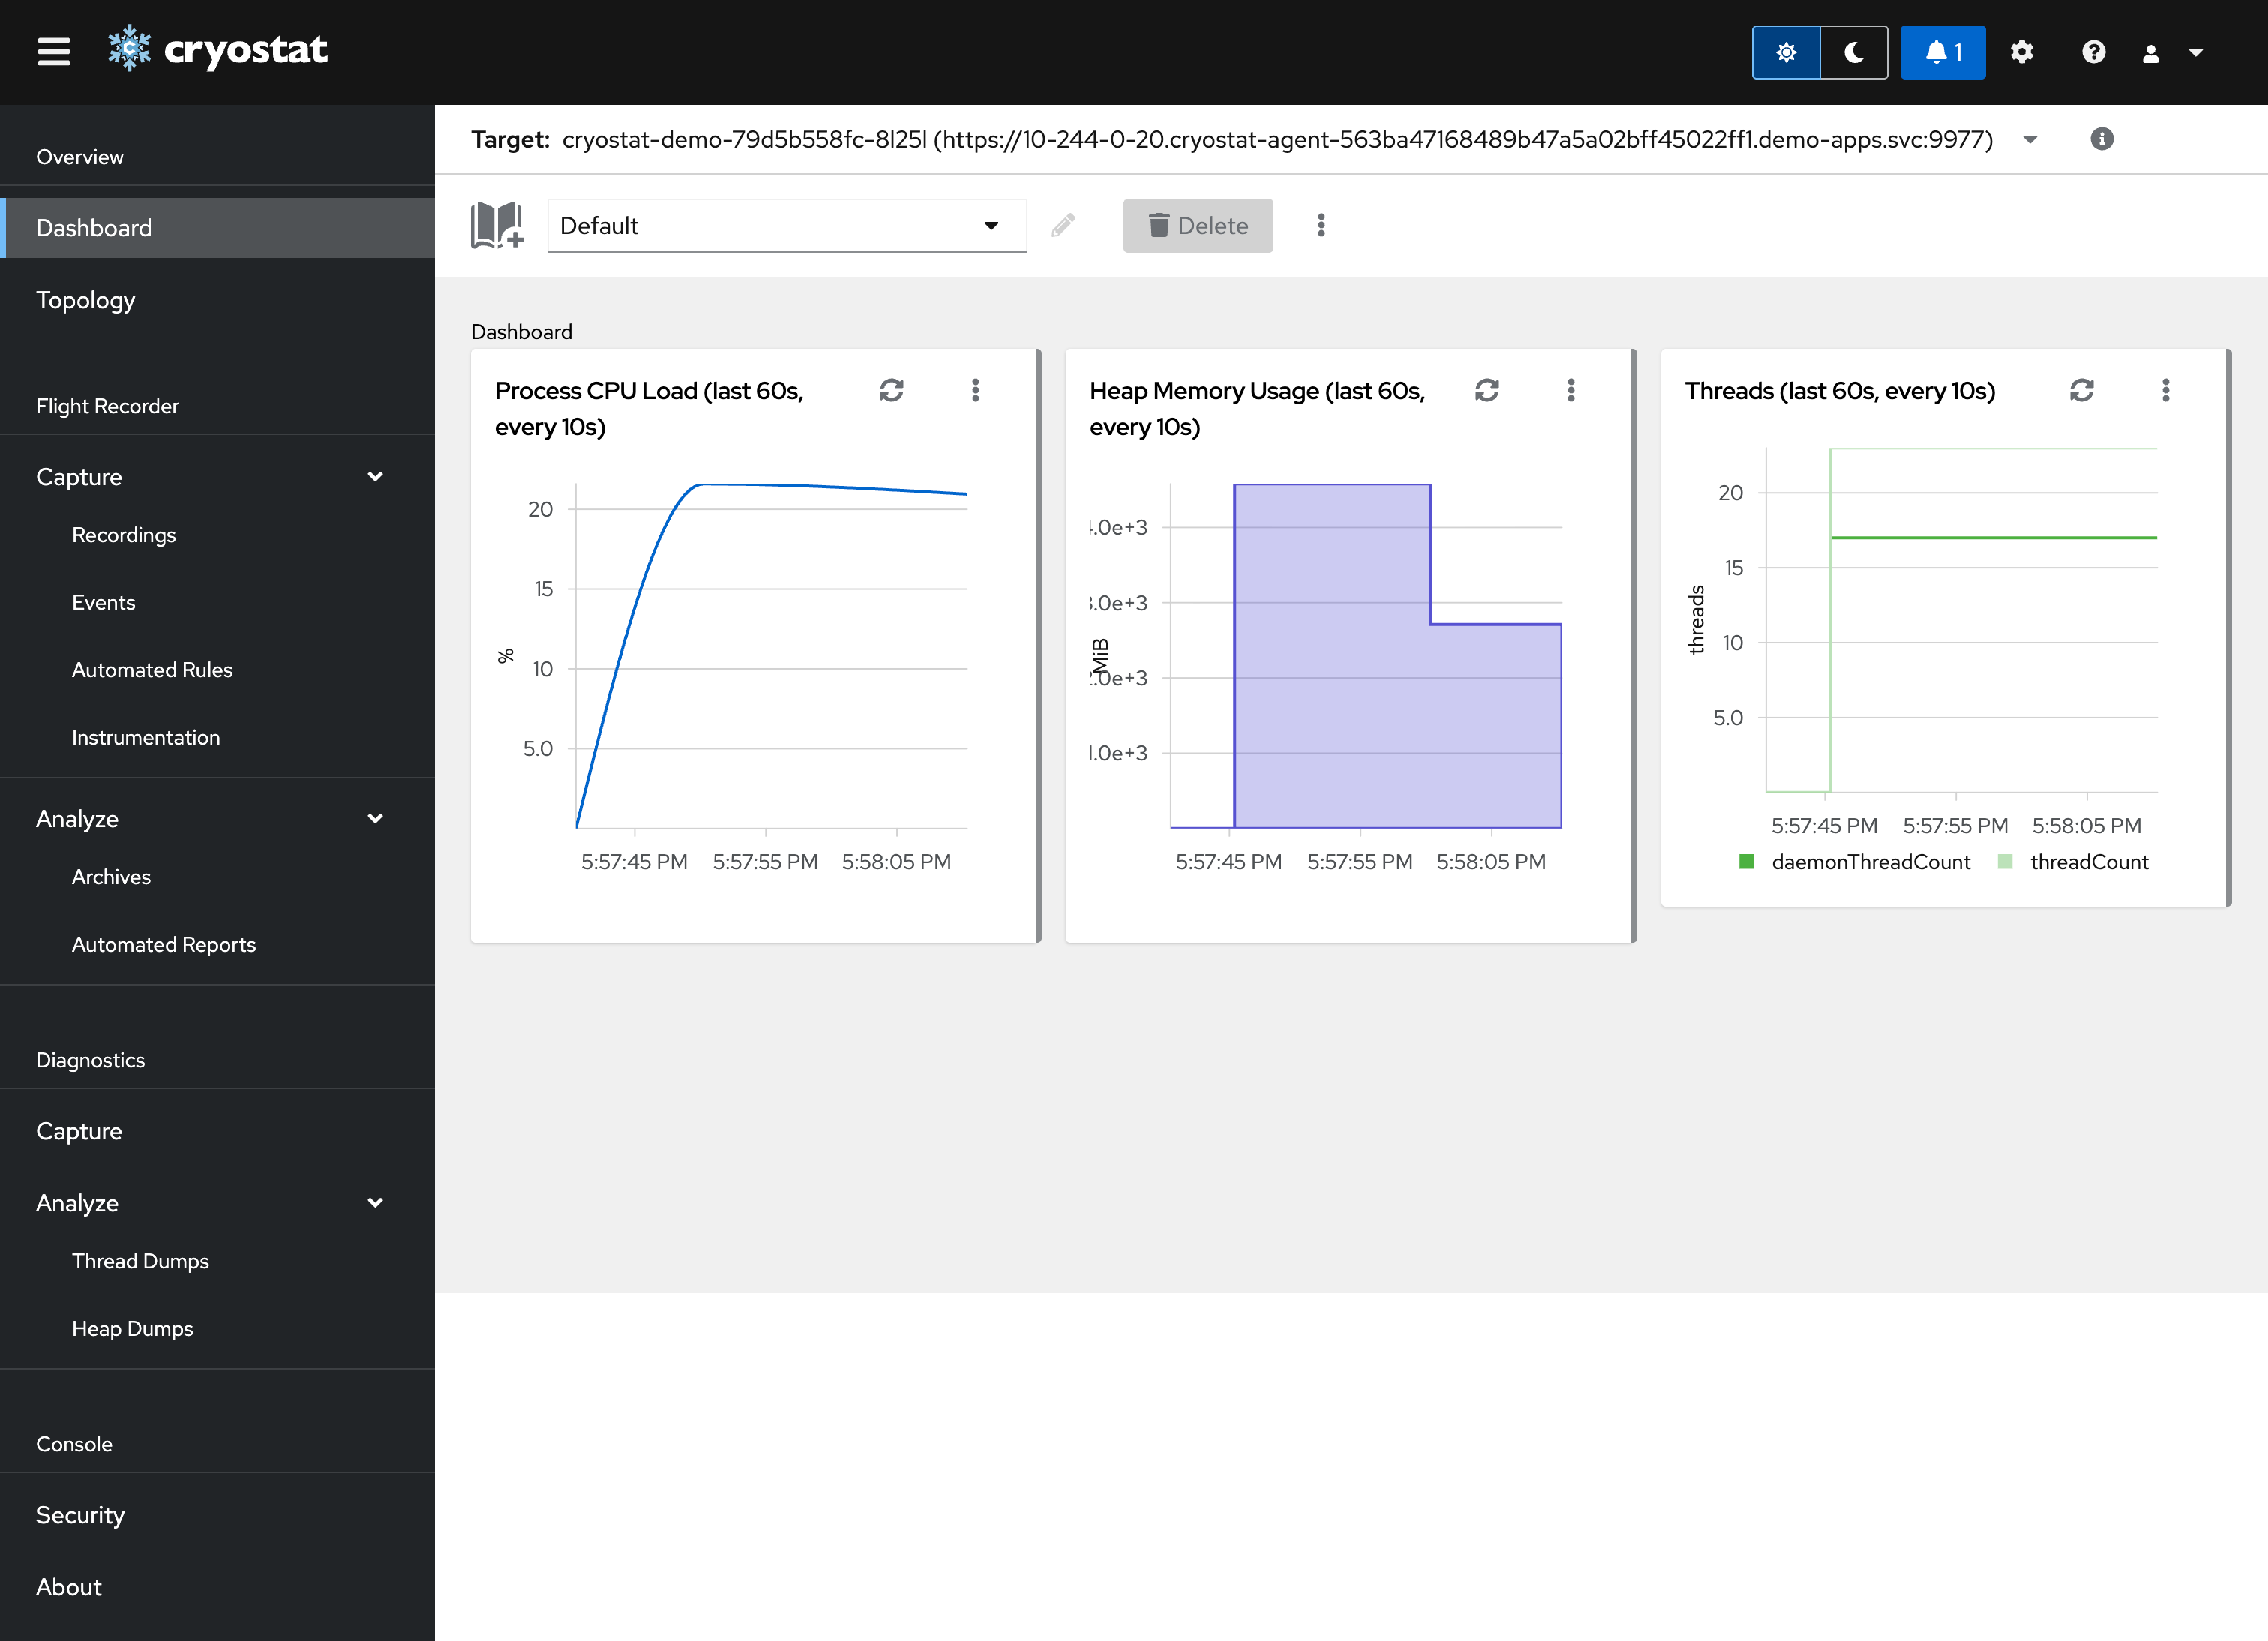
In the Cryostat UI:
Open the
cryostat-demotargetStart a recording (about 30 seconds is enough for this demo)
Choose the uploaded profile template for CPU-oriented work, or default if you want a smaller event set
Stop the recording
Run Automated Analysis
Add MBean and JFR metrics cards to the dashboard
At that point you have both kinds of view you usually want in practice: live JVM state from MBeans and recording-backed data from JFR. That is enough to tell whether you are chasing allocation churn, CPU time, or something else entirely.
Production notes
Storage - emptyDir is fine for a lab. It is useless for retention, which means production needs PVCs or external object storage and a retention policy someone can defend without improvising.
Access control - Cryostat on plain Kubernetes does not magically become safe because it is inside the cluster. Decide how you want authentication and authorization to work before this stops being a local-only setup.
Namespace scope - targetNamespaces is an access boundary, not just a convenience knob. If Cryostat can see a namespace, it can collect data from workloads in that namespace.
Resource planning - Cryostat is not a tiny sidecar. Give it real CPU and memory headroom or you will spend time blaming the tool for a cluster sizing problem.
Cleanup
kubectl delete -f kubernetes/cryostat-demo.yaml
kubectl delete -f kubernetes/cryostat.yaml
kubectl delete namespace demo-apps
kubectl delete namespace cryostat
minikube delete
Closing
The application here is deliberately small, because the point is not the application. The useful part is the path: in-cluster discovery, Operator-driven agent setup, JFR capture, and automated analysis without smuggling profiler setup into every image you ship.