

High-Throughput AI Video Processing with Quarkus and LangChain4j
A practical Java guide to mixing JavaCV face detection and multimodal LLM sentiment in one real-time pipeline.


In many enterprise systems you have two very different requirements in the same flow:
High-throughput, low-latency streaming (video, events, sensor data).
Latency-sensitive, expensive AI calls (vision & language models).
Sending every raw frame to an LLM is slow and costly. A better pattern is split responsibility:
Use fast, local code (JavaCV/OpenCV) to pre-process and detect objects.
Use LangChain4j with a vision-capable model only on the relevant fragments.
In this lab you’ll implement exactly that:
The browser captures frames from your webcam.
It sends them over a WebSocket to a Quarkus backend.
JavaCV finds a face and crops an extended region.
LangChain4j + OpenAI classify the emotion in that cropped face.
The browser shows a 2×2 “emotion grid” with annotated images and labels.
By the end you will have a working live demo and a concrete pattern you can reuse in your own systems.
Prerequisites & Environment
You need:
JDK 21
Maven 3.8+
Recent browser with webcam support (Chrome/Firefox/Edge)
OpenAI API key with access to
gpt-4.1-mini(includes vision)A webcam on your machine
We’ll use:
Quarkus WebSockets Next for streaming binary frames
Quarkus LangChain4j OpenAI integration
JavaCV / OpenCV for face detection
Project Bootstrap
You can either clone my Github repo or recreate it from scratch.
To follow the lab as a “greenfield” setup, create a new Quarkus app:
mvn io.quarkus.platform:quarkus-maven-plugin:create \
  -DprojectGroupId=com.example \
  -DprojectArtifactId=emotion-detector \
  -DclassName="com.example.VideoSocket" \
  -Dpath="/stream"
  -Dextensions="websockets-next,langchain4j-openai"
cd emotion-detector
Add the additional dependencies to your pom.xml:
        <dependency>
            <groupId>org.bytedeco</groupId>
            <artifactId>javacv-platform</artifactId>
            <version>1.5.12</version>
            <exclusions>
                <exclusion>
                    <groupId>org.openjfx</groupId>
                    <artifactId>javafx-graphics</artifactId>
                </exclusion>
                <exclusion>
                    <groupId>org.openjfx</groupId>
                    <artifactId>javafx-base</artifactId>
                </exclusion>
            </exclusions>
        </dependency>
Configure LangChain4j, WebSockets & Logging
Open src/main/resources/application.properties and replace with the attached config :
# OpenAI model configuration
quarkus.langchain4j.openai.api-key=${OPENAI_API_KEY}
quarkus.langchain4j.openai.chat-model.model-name=gpt-4.1-mini
quarkus.langchain4j.timeout=30S
quarkus.langchain4j.openai.chat-model.log-responses=true

# WebSocket configuration - increase max frame size for JPEG images
quarkus.websockets-next.server.max-frame-size=2097152

# Enable WebSocket traffic logging for debugging
quarkus.websockets-next.server.traffic-logging.enabled=true
quarkus.log.category.”io.quarkus.websockets.next.traffic”.level=DEBUG

# Application logging
quarkus.log.category.”com.example”.level=INFO

# LangChain4j debug logging
quarkus.log.category.”dev.langchain4j”.level=DEBUG
quarkus.log.category.”io.quarkiverse.langchain4j”.level=DEBUG
Set the OPENAI_API_KEY environment variable before running Quarkus:
export OPENAI_API_KEY=sk-...You can switch to a local vision model later by changing the dependency and configuration, but we’ll keep the lab focused on OpenAI for now.
Implement the Emotion AI Service (LangChain4j)
Create src/main/java/com/example/EmotionAgent.java :
package com.example;

import dev.langchain4j.data.image.Image;
import dev.langchain4j.service.SystemMessage;
import dev.langchain4j.service.UserMessage;
import io.quarkiverse.langchain4j.RegisterAiService;
import jakarta.enterprise.context.ApplicationScoped;

@RegisterAiService
@ApplicationScoped
public interface EmotionAgent {

    @SystemMessage(”“”
            You are an expert facial expression analyst. Analyze the facial expression in the image and respond with ONLY a single emotion word.
            “”“)
    String detect(
            @UserMessage(”What emotion is shown in this face image? Respond with only one word: happy, sad, angry, fearful, disgusted, surprised, or neutral.”) Image faceImage);
}
This interface is all you need. The Quarkus LangChain4j extension generates the implementation and wires it to OpenAI.
Now add a small service that:
Accepts a JPEG byte array.
Encodes it as base64.
Wraps it into a LangChain4j
Image.Calls the agent and returns a
Uni<String>.
Create src/main/java/com/example/SentimentService.java :
package com.example;

import java.util.Base64;
import java.util.logging.Logger;

import dev.langchain4j.data.image.Image;
import io.smallrye.mutiny.Uni;
import jakarta.enterprise.context.ApplicationScoped;
import jakarta.inject.Inject;

@ApplicationScoped
public class SentimentService {

    private static final Logger LOG = Logger.getLogger(SentimentService.class.getName());

    @Inject
    EmotionAgent agent;

    public Uni<String> analyzeAsync(byte[] jpeg) {
        LOG.info(”Starting sentiment analysis for “ + jpeg.length + “ byte image”);
        return Uni.createFrom().item(() -> {
            try {
                LOG.info(”Encoding image to base64...”);
                String base64String = Base64.getEncoder().encodeToString(jpeg);
                LOG.info(”Base64 length: “ + base64String.length());

                // Log a sample of the base64 to verify it’s image data, not metadata
                if (base64String.length() > 100) {
                    LOG.info(”Base64 preview (first 100 chars): “ + base64String.substring(0, 100));
                }

                LOG.info(”Creating Image using builder...”);
                Image langchainImage = Image.builder()
                        .base64Data(base64String)
                        .mimeType(”image/jpeg”)
                        .build();

                LOG.info(”Calling agent.detect()...”);
                String result = agent.detect(langchainImage);
                LOG.info(”Agent returned: “ + result);

                return result;
            } catch (Exception e) {
                LOG.severe(”Error in sentiment analysis: “ + e.getMessage());
                e.printStackTrace();
                throw e;
            }
        });
    }
}
This is the “cognition” part of the pipeline.
Implement Face Detection with JavaCV
We want to avoid sending full frames to the LLM. Instead we:
Decode the JPEG into an OpenCV
Mat.Run a Haar cascade classifier to detect faces.
Draw a bounding box with a heuristic “confidence”.
Expand the bounding box to include a bit more context.
Encode both the annotated full image and the cropped face back to JPEG.
Add the cascade file
Place the haarcascade_frontalface_default.xml (from this Github repository) in:
src/main/resources/haarcascade_frontalface_default.xml
Use the exact file you attached.
Create the result DTO
Create src/main/java/com/example/FaceDetectionResult.java :
package com.example;

public class FaceDetectionResult {
    private final byte[] annotatedImage; // Original image with bounding box overlay
    private final byte[] faceImage; // Extracted face for emotion analysis
    private final int x;
    private final int y;
    private final int width;
    private final int height;
    private final double confidence; // Approximate confidence based on detection parameters

    public FaceDetectionResult(byte[] annotatedImage, byte[] faceImage, int x, int y, int width, int height, double confidence) {
        this.annotatedImage = annotatedImage;
        this.faceImage = faceImage;
        this.x = x;
        this.y = y;
        this.width = width;
        this.height = height;
        this.confidence = confidence;
    }

    public byte[] getAnnotatedImage() {
        return annotatedImage;
    }

    public byte[] getFaceImage() {
        return faceImage;
    }

    public int getX() {
        return x;
    }

    public int getY() {
        return y;
    }

    public int getWidth() {
        return width;
    }

    public int getHeight() {
        return height;
    }

    public double getConfidence() {
        return confidence;
    }
}
Implement the detector
Create src/main/java/com/example/FaceDetectorService.java and use the following implementation :
package com.example;

import static org.bytedeco.opencv.global.opencv_core.CV_8UC1;

import java.io.IOException;
import java.io.InputStream;
import java.nio.file.Files;
import java.nio.file.Path;
import java.nio.file.Paths;
import java.nio.file.StandardCopyOption;
import java.util.logging.Logger;

import org.bytedeco.javacpp.BytePointer;
import org.bytedeco.opencv.global.opencv_imgcodecs;
import org.bytedeco.opencv.global.opencv_imgproc;
import org.bytedeco.opencv.opencv_core.Mat;
import org.bytedeco.opencv.opencv_core.Point;
import org.bytedeco.opencv.opencv_core.Rect;
import org.bytedeco.opencv.opencv_core.RectVector;
import org.bytedeco.opencv.opencv_core.Scalar;
import org.bytedeco.opencv.opencv_objdetect.CascadeClassifier;

import jakarta.annotation.PostConstruct;
import jakarta.enterprise.context.ApplicationScoped;

@ApplicationScoped
public class FaceDetectorService {

    private static final Logger LOG = Logger.getLogger(FaceDetectorService.class.getName());
    private CascadeClassifier detector;

    @PostConstruct
    void init() throws IOException {
        LOG.info(”Initializing FaceDetectorService...”);

        // Load the cascade file from classpath and extract to temp file
        // OpenCV CascadeClassifier requires a filesystem path, not a classpath resource
        InputStream resourceStream = getClass().getClassLoader()
                .getResourceAsStream(”haarcascade_frontalface_default.xml”);
        if (resourceStream == null) {
            LOG.severe(”Cascade file not found in resources!”);
            throw new IllegalStateException(”Cascade file not found in resources”);
        }
        LOG.info(”Found cascade file in resources”);

        // Create temp file in target directory
        Path targetDir = Paths.get(”target”);
        if (!Files.exists(targetDir)) {
            Files.createDirectories(targetDir);
        }
        Path tempFile = targetDir.resolve(”haarcascade_frontalface_default.xml”);
        tempFile.toFile().deleteOnExit();
        Files.copy(resourceStream, tempFile, StandardCopyOption.REPLACE_EXISTING);
        resourceStream.close();
        LOG.info(”Extracted cascade file to: “ + tempFile.toAbsolutePath());

        detector = new CascadeClassifier(tempFile.toAbsolutePath().toString());
        if (detector.empty()) {
            LOG.severe(”Failed to load cascade classifier!”);
            throw new IllegalStateException(”Failed to load cascade classifier”);
        }
        LOG.info(”Cascade classifier loaded successfully”);
    }

    public FaceDetectionResult detectAndAnnotateFace(byte[] jpeg) {
        LOG.info(”Detecting and annotating face from “ + jpeg.length + “ byte JPEG”);

        try {
            // Create a Mat from the JPEG byte array for decoding
            BytePointer encodedData = new BytePointer(jpeg);
            Mat encodedMat = new Mat(1, jpeg.length, CV_8UC1, encodedData);
            Mat original = opencv_imgcodecs.imdecode(encodedMat, opencv_imgcodecs.IMREAD_COLOR);

            if (original == null || original.empty()) {
                LOG.warning(”Failed to decode JPEG image”);
                return null;
            }
            LOG.info(”Decoded image: “ + original.cols() + “x” + original.rows());

            Mat gray = new Mat();
            opencv_imgproc.cvtColor(original, gray, opencv_imgproc.COLOR_BGR2GRAY);
            LOG.info(”Converted to grayscale”);

            RectVector faces = new RectVector();
            detector.detectMultiScale(gray, faces);
            LOG.info(”Face detection found “ + faces.size() + “ face(s)”);

            if (faces.size() == 0) {
                LOG.info(”No faces detected”);
                return null;
            }

            Rect rect = faces.get(0);
            int x = rect.x();
            int y = rect.y();
            int width = rect.width();
            int height = rect.height();
            LOG.info(”Extracting face at: x=” + x + “, y=” + y + “, w=” + width + “, h=” + height);

            // Calculate approximate confidence based on face size relative to image
            double imageArea = original.cols() * original.rows();
            double faceArea = width * height;
            double confidence = Math.min(100.0, (faceArea / imageArea) * 500.0); // Heuristic confidence

            // Draw bounding box on original image
            Mat annotated = original.clone();
            Point pt1 = new Point(x, y);
            Point pt2 = new Point(x + width, y + height);
            Scalar color = new Scalar(0, 255, 0, 0); // Green color (BGR)
            int thickness = 2;
            opencv_imgproc.rectangle(annotated, pt1, pt2, color, thickness, opencv_imgproc.LINE_8, 0);

            // Add text with confidence
            String label = String.format(”Face: %.1f%%”, confidence);
            Point textOrg = new Point(x, y - 10);
            if (textOrg.y() < 0) {
                textOrg.y(y + height + 20);
            }
            Scalar textColor = new Scalar(0, 255, 0, 0); // Green text
            double fontScale = 0.6;
            int fontFace = opencv_imgproc.FONT_HERSHEY_SIMPLEX;
            opencv_imgproc.putText(annotated, label, textOrg, fontFace, fontScale, textColor, 2, opencv_imgproc.LINE_AA,
                    false);

            LOG.info(”Drew bounding box and label: “ + label);

            // Expand bounding box for emotion analysis (include more context)
            // Use 50% padding on all sides for better emotion detection
            double expansionFactor = 0.5;
            int expandedX = Math.max(0, (int) (x - width * expansionFactor));
            int expandedY = Math.max(0, (int) (y - height * expansionFactor));
            int expandedWidth = Math.min(original.cols() - expandedX, (int) (width * (1 + 2 * expansionFactor)));
            int expandedHeight = Math.min(original.rows() - expandedY, (int) (height * (1 + 2 * expansionFactor)));

            Rect expandedRect = new Rect(expandedX, expandedY, expandedWidth, expandedHeight);
            LOG.info(”Expanded face region for analysis: x=” + expandedX + “, y=” + expandedY +
                    “, w=” + expandedWidth + “, h=” + expandedHeight);

            // Extract expanded face region for emotion analysis
            Mat face = new Mat(original, expandedRect);

            // Encode annotated image
            BytePointer annotatedBuffer = new BytePointer();
            opencv_imgcodecs.imencode(”.jpg”, annotated, annotatedBuffer);
            byte[] annotatedImage = new byte[(int) annotatedBuffer.limit()];
            annotatedBuffer.get(annotatedImage);

            // Encode face image
            BytePointer faceBuffer = new BytePointer();
            opencv_imgcodecs.imencode(”.jpg”, face, faceBuffer);
            byte[] faceImage = new byte[(int) faceBuffer.limit()];
            faceBuffer.get(faceImage);

            LOG.info(”Encoded annotated image to “ + annotatedImage.length + “ bytes, face to “ + faceImage.length
                    + “ bytes”);

            return new FaceDetectionResult(annotatedImage, faceImage, x, y, width, height, confidence);
        } catch (Exception e) {
            LOG.severe(”Error in detectAndAnnotateFace: “ + e.getMessage());
            e.printStackTrace();
            return null;
        }
    }
}
This is your “filter & crop” stage.
Wire Everything with a WebSocket Endpoint
Now we connect streaming frames from the browser to our services.
Create src/main/java/com/example/VideoSocket.java :
package com.example;

import io.quarkus.websockets.next.OnBinaryMessage;
import io.quarkus.websockets.next.OnClose;
import io.quarkus.websockets.next.OnOpen;
import io.quarkus.websockets.next.WebSocket;
import io.quarkus.websockets.next.WebSocketConnection;
import jakarta.inject.Inject;

import java.util.logging.Logger;

@WebSocket(path = “/stream”)
public class VideoSocket {

    private static final Logger LOG = Logger.getLogger(VideoSocket.class.getName());

    @Inject
    FaceDetectorService faceDetector;

    @Inject
    SentimentService sentiment;

    @OnOpen
    public void onOpen(WebSocketConnection connection) {
        LOG.info(”WebSocket connection opened: “ + connection.id());
    }

    @OnClose
    public void onClose(WebSocketConnection connection) {
        LOG.info(”WebSocket connection closed: “ + connection.id());
    }

    @OnBinaryMessage
    public void onFrame(WebSocketConnection connection, byte[] frameData) {
        LOG.info(”Received WebSocket frame: “ + frameData.length + “ bytes”);

        try {
            FaceDetectionResult result = faceDetector.detectAndAnnotateFace(frameData);
            LOG.info(”Face detection result: “ + (result != null ? “face found” : “no face detected”));

            if (result != null) {
                // Send annotated image with bounding box
                byte[] annotatedImage = result.getAnnotatedImage();
                LOG.info(”Sending annotated image: “ + annotatedImage.length + “ bytes”);
                connection.sendBinaryAndAwait(annotatedImage);

                // Start sentiment analysis on extracted face
                byte[] face = result.getFaceImage();
                LOG.info(”Starting sentiment analysis on face: “ + face.length + “ bytes”);
                sentiment.analyzeAsync(face)
                        .subscribe().with(
                            emotion -> {
                                LOG.info(”Sentiment analysis result: “ + emotion);
                                // Send emotion without confidence (confidence is shown on image overlay)
                                connection.sendTextAndAwait(emotion);
                                LOG.info(”Sent emotion to client: “ + emotion);
                            },
                            error -> {
                                LOG.severe(”Error in sentiment analysis: “ + error.getMessage());
                                error.printStackTrace();
                                connection.sendTextAndAwait(”Error”);
                            }
                        );
            } else {
                LOG.info(”No face detected, sending original image and ‘No Face’ response”);
                // Send original image back
                connection.sendBinaryAndAwait(frameData);
                connection.sendTextAndAwait(”No Face”);
            }
        } catch (Exception e) {
            LOG.severe(”Error processing frame: “ + e.getMessage());
            e.printStackTrace();
            try {
                // Send original image back and error message
                connection.sendBinaryAndAwait(frameData);
                connection.sendTextAndAwait(”Error”);
            } catch (Exception ex) {
                LOG.severe(”Failed to send error message: “ + ex.getMessage());
            }
        }
    }
}
Key idea:
Binary messages are treated as JPEG frames.
If a face is found, we send back an annotated frame and then a text emotion.
If not, we echo the original frame and send
“No Face”.
The browser uses two FIFO queues to match “annotated frame” and “emotion” messages per slot.
Build the Browser UI (Emotion Grid)
Quarkus serves static resources from src/main/resources/META-INF/resources.
Create the directory and add src/main/resources/META-INF/resources/index.html with the following content :
<!DOCTYPE html>
<html>
<head>
    <style>
       <!-- skipped -->
    </style>
</head>
<body>

<div class=”container”>
    <div class=”video-section”>
        <video id=”video” autoplay width=”640” height=”480”></video>
        <div id=”status”>Connecting...</div>
        <div class=”instructions”>Click on the video to capture and analyze</div>
    </div>
    <div class=”grid-section”>
        <div class=”grid-title”>Emotion Grid</div>
        <div class=”grid” id=”grid”></div>
    </div>
</div>
<canvas id=”canvas” width=”640” height=”480”></canvas>

<script>
    const video = document.getElementById(”video”);
    const statusDiv = document.getElementById(”status”);
    const grid = document.getElementById(”grid”);
    const ws = new WebSocket(”ws://localhost:8080/stream”);

    const GRID_SIZE = 4; // 2x2 grid
    let nextIndex = 0;
    const pendingImageRequests = [];
    const pendingEmotionRequests = [];

    for (let i = 0; i < GRID_SIZE; i++) {
        const cell = document.createElement(”div”);
        cell.className = “grid-cell empty”;
        cell.id = `cell-${i}`;
        cell.textContent = “Empty”;
        grid.appendChild(cell);
    }

    ws.onopen = () => {
        statusDiv.textContent = “Connected - Waiting for camera access...”;
        statusDiv.style.color = “#4CAF50”;
        console.log(”WebSocket connected”);
    };

    ws.onclose = () => {
        statusDiv.textContent = “Disconnected”;
        statusDiv.style.color = “#f44336”;
        console.log(”WebSocket disconnected”);
    };

    ws.onerror = (error) => {
        statusDiv.textContent = “Error: “ + error;
        statusDiv.style.color = “#f44336”;
        console.error(”WebSocket error:”, error);
    };

    navigator.mediaDevices.getUserMedia({ video: true })
        .then(stream => {
            video.srcObject = stream;
            statusDiv.textContent = “Ready - Click video to capture”;
            statusDiv.style.color = “#4CAF50”;
        })
        .catch(error => {
            statusDiv.textContent = “Camera error: “ + error.message;
            statusDiv.style.color = “#f44336”;
            console.error(”Camera access error:”, error);
        });

    video.addEventListener(”click”, () => {
        if (ws.readyState !== WebSocket.OPEN) {
            statusDiv.textContent = “Not connected”;
            statusDiv.style.color = “#f44336”;
            return;
        }

        const canvas = document.getElementById(”canvas”);
        const ctx = canvas.getContext(”2d”);
        ctx.drawImage(video, 0, 0, 640, 480);

        canvas.toBlob(blob => {
            if (blob) {
                const imageUrl = canvas.toDataURL(”image/jpeg”);

                const cellIndex = nextIndex % GRID_SIZE;
                nextIndex++;

                const imageData = {
                    cellIndex: cellIndex,
                    imageUrl: imageUrl,
                    timestamp: Date.now()
                };

                updateCell(cellIndex, imageUrl, “Processing...”, true);

                pendingImageRequests.push(imageData);

                ws.send(blob);
                console.log(`Sent image to cell ${cellIndex}, waiting for annotated image`);
            }
        }, “image/jpeg”);
    });

    ws.onmessage = msg => {
        if (msg.data instanceof Blob) {
            console.log(”Received annotated image (binary)”);
            const blob = msg.data;
            const imageUrl = URL.createObjectURL(blob);

            if (pendingImageRequests.length > 0) {
                const imageData = pendingImageRequests.shift();
                updateCell(imageData.cellIndex, imageUrl, “Processing...”, true);

                pendingEmotionRequests.push({
                    cellIndex: imageData.cellIndex,
                    imageUrl: imageUrl
                });
                console.log(`Updated cell ${imageData.cellIndex} with annotated image, waiting for emotion`);
            } else {
                console.warn(”Received annotated image but no pending image requests”);
            }
        } else {
            const emotion = msg.data.trim();
            console.log(”Emotion received:”, emotion);

            if (pendingEmotionRequests.length > 0) {
                const imageData = pendingEmotionRequests.shift();
                updateCell(imageData.cellIndex, imageData.imageUrl, emotion, false);
                console.log(`Updated cell ${imageData.cellIndex} with emotion: ${emotion}`);
            } else {
                console.warn(”Received emotion but no pending emotion requests”);
            }
        }
    };

    function updateCell(index, imageUrl, emotion, isProcessing) {
        const cell = document.getElementById(`cell-${index}`);
        cell.className = “grid-cell”;
        cell.innerHTML = “”;

        const img = document.createElement(”img”);
        img.src = imageUrl;
        img.alt = “Captured image”;
        cell.appendChild(img);

        const emotionDiv = document.createElement(”div”);
        if (isProcessing) {
            emotionDiv.className = “processing”;
            emotionDiv.textContent = emotion;
        } else {
            emotionDiv.className = “emotion”;
            emotionDiv.textContent = emotion || “Unknown”;
        }
        cell.appendChild(emotionDiv);
    }
</script>

</body>
</html>
This file:
Connects to
ws://localhost:8080/stream.Captures a frame when you click on the video.
Keeps a 2×2 grid of the most recent frames.
Updates each cell with an annotated image and emotion label.
Run & Verify
From the project root:
export OPENAI_API_KEY=sk-...   # if not already set
mvn quarkus:dev
Open your browser at: http://localhost:8080/
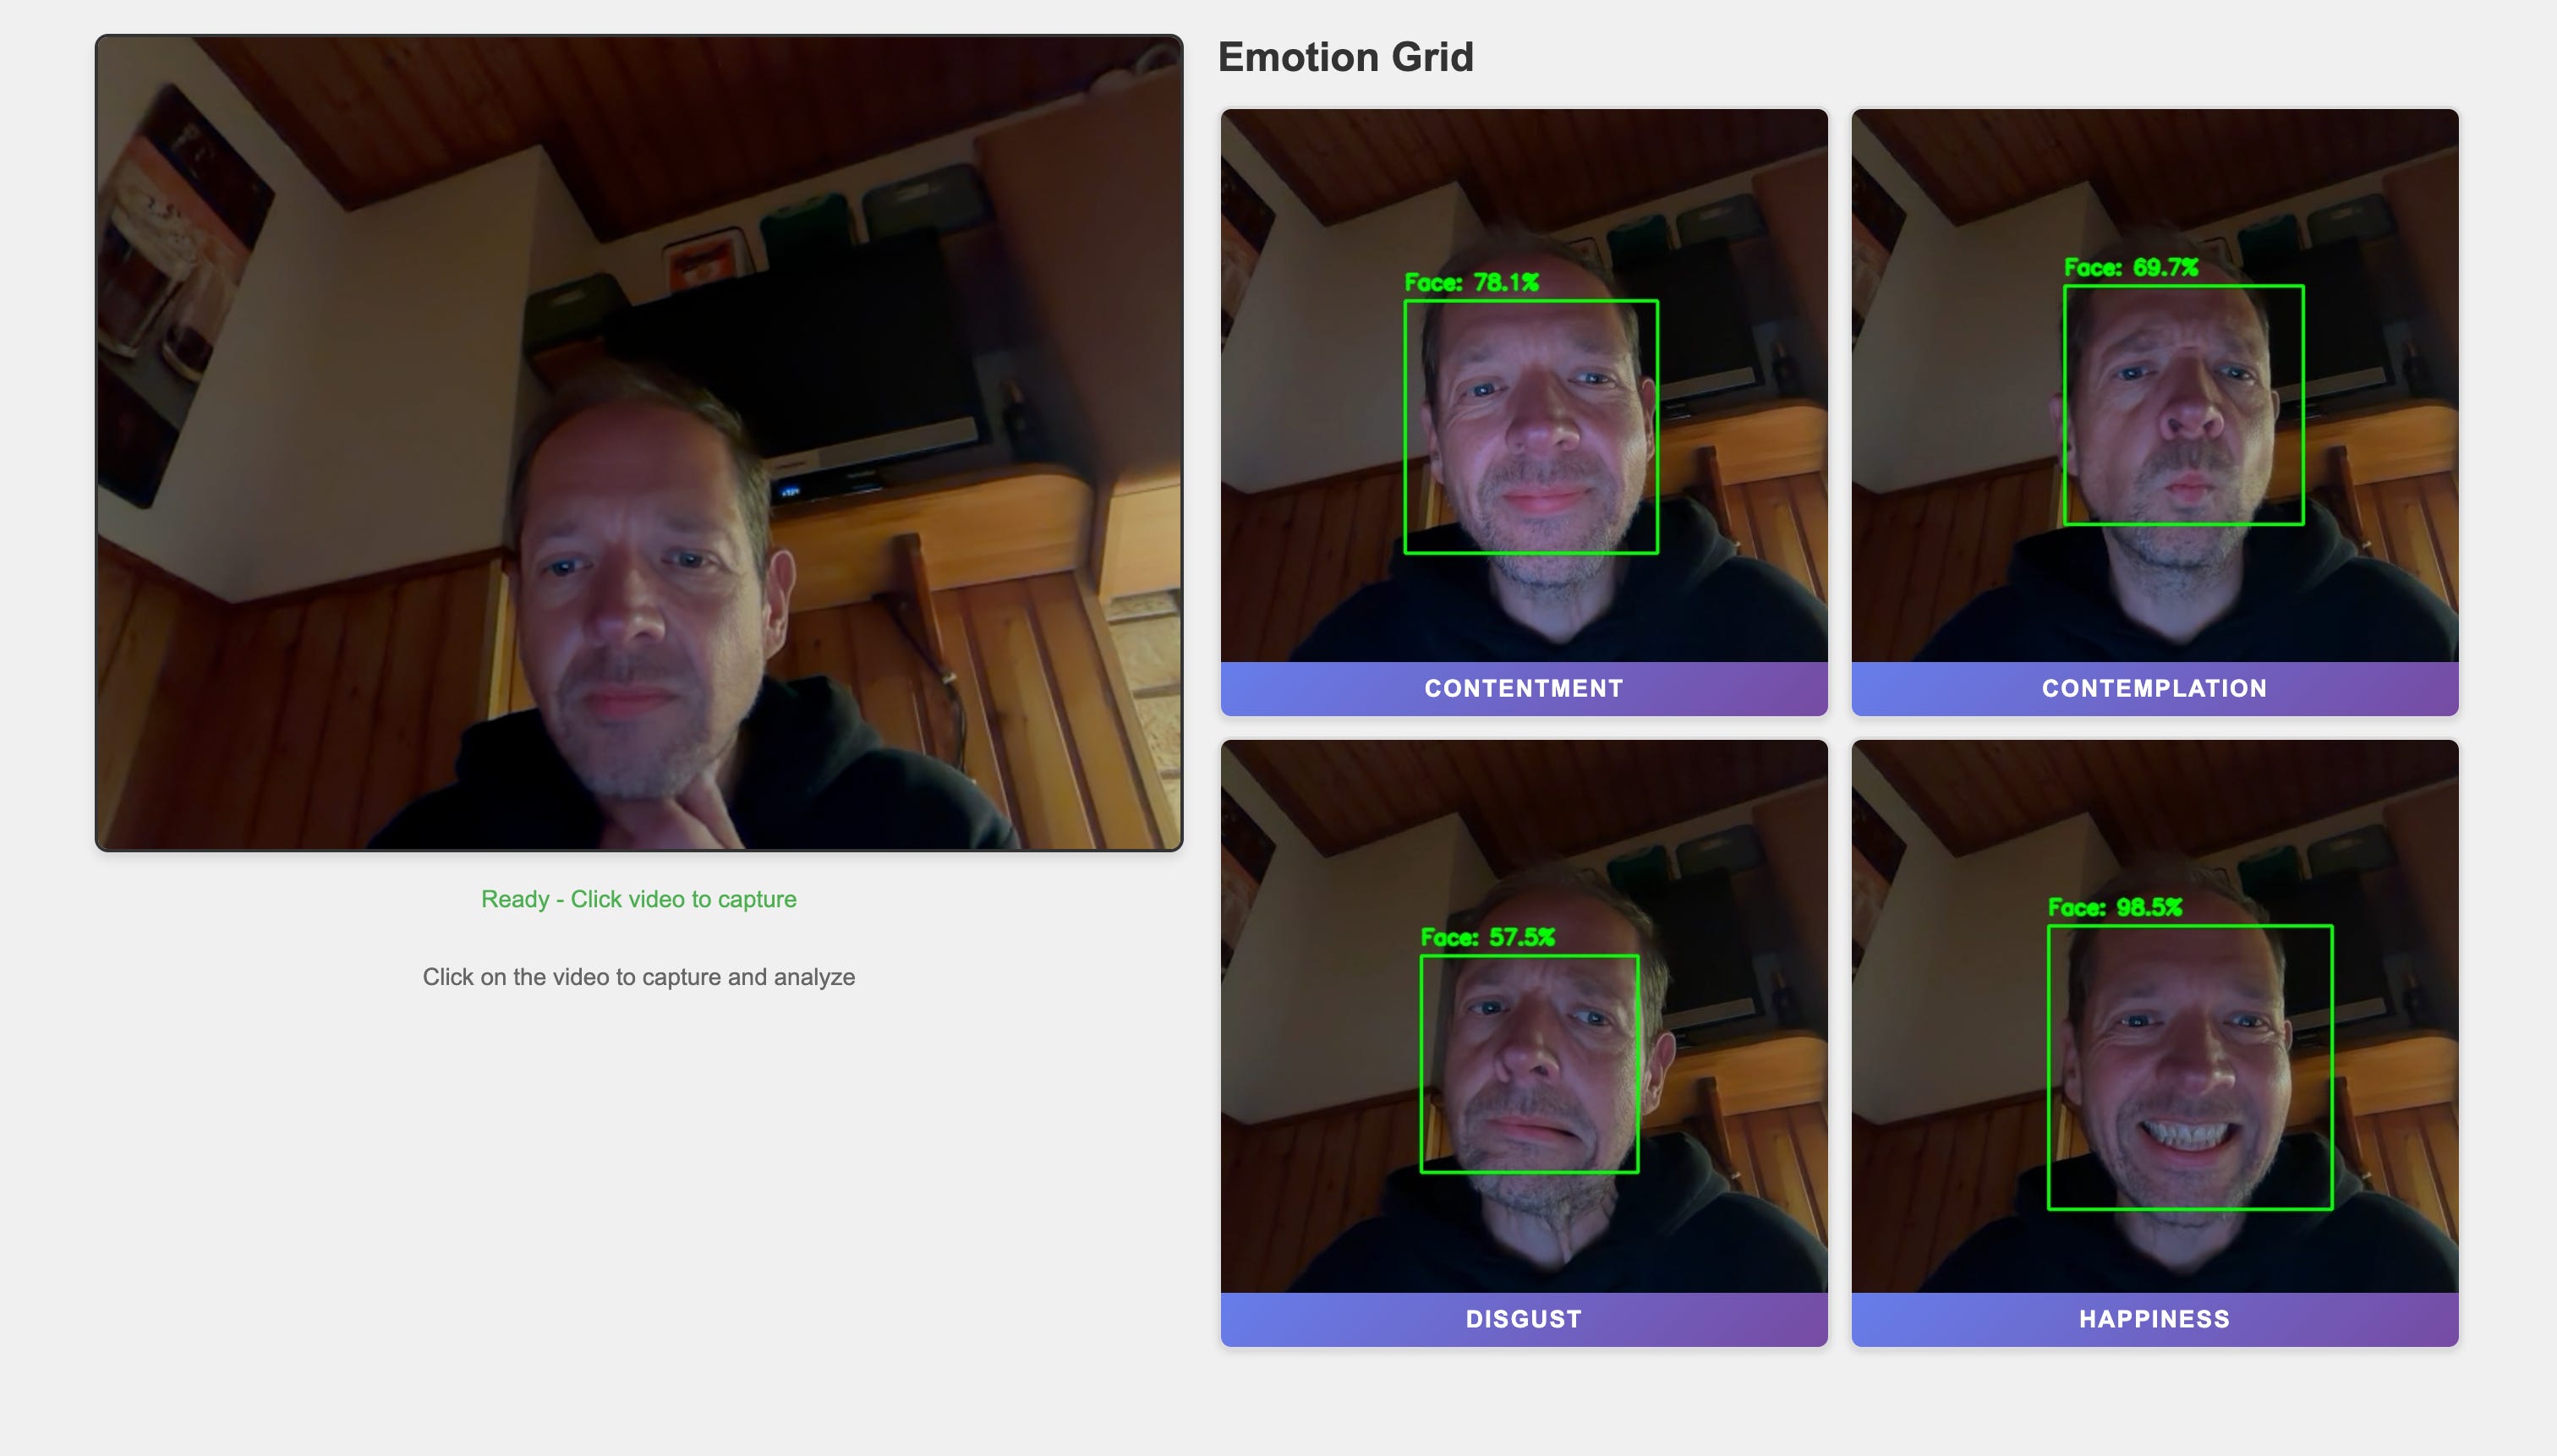
You should see:
The live webcam view on the left.
An “Emotion Grid” on the right with four empty cells.
Click inside the video several times with different expressions:
Smile, frown, look surprised.
Each click sends a frame to the backend.
If a face is detected, you’ll see:
The grid cell updated with the annotated image (green bounding box, confidence label).
After a short delay, the emotion banner at the bottom of that cell (e.g.
HAPPY,NEUTRAL).
If no face is found, the cell will show the original frame and text No Face.
Check the Quarkus logs in your terminal for detailed traces from:
FaceDetectorServiceSentimentServiceLangChain4j and WebSockets traffic
Production Notes & Architecture Lessons
Some practical considerations:
Cost control: only the cropped face region is sent to the LLM, not the full 640×480 frame. This is the core “split responsibility” pattern you can reuse.
Frame rate: in this demo you manually click. In a real system you would throttle to at most a few FPS for analysis, even if the stream itself is higher.
Security:
Never log raw image data in production.
Consider whether face images are personal data in your jurisdiction.
Add authentication around the WebSocket in real deployments.
Performance:
javacv-platformincludes native libs for multiple platforms. For lean container images, switch to platform-specific artifacts.If you move this to native mode, test JavaCV and the cascade classifier thoroughly. Some OpenCV parts can be tricky in native images.
Resilience:
Add timeouts and fallbacks around the AI call.
Return a safe “Unknown” emotion if the model fails.
Rule of thumb: push as much work as possible into local, deterministic code and keep AI calls narrow, focused, and rate-limited.
Variations & Next Steps
Here are some ideas to extend the lab:
Replace OpenAI with a local vision model (e.g. via an Ollama-compatible LangChain4j extension) and compare performance.
Persist snapshots and emotions to a database using Panache and build a simple analytics dashboard.
Add a backend REST endpoint that exposes aggregated statistics (e.g. emotions per minute) for Grafana.
Handle multiple concurrent users by tagging WebSocket messages with session identifiers and pushing results to specific clients.
This lab gives you a concrete, working pattern: use Quarkus for the streaming backbone, JavaCV for fast local detection, and LangChain4j for focused, high-value AI inference.