

Build a Streaming AI Chat in Java with Quarkus, Vaadin, and LangChain4j
A hands-on guest post by Sebastian Kühnau showing how to stream LLM responses token by token in a pure Java UI with Vaadin Flow and Quarkus.

This article is a guest post by Sebastian Kühnau from Vaadin. Sebastian put together a very practical walkthrough that shows how well Vaadin Flow fits a Java-first AI UI. Thanks to Sebastian for sharing this with The Main Thread.
The tutorial below can be followed in his reference project on Github.
Vaadin lets you build modern, component-driven, data-centric web UIs using current web standards — without leaving the Java ecosystem. It uses web components on the client side and exposes them entirely through a Java API. No JavaScript, no build pipeline, no framework churn.
Streaming responses token by token, updating the UI reactively — all of that works within the Java ecosystem you already know. This makes Vaadin a natural fit for AI-powered interfaces. In this tutorial, we’ll combine Quarkus, Vaadin Flow, and LangChain4j to build a streaming AI chat interface in pure Java. If you’re using Spring Boot instead of Quarkus, Vaadin has a dedicated AI quickstart guide for that stack as well.
Prerequisites
You need:
Java 25+
Maven 3.9.12+
An OpenAI API key
We’ll use:
Quarkus 3.32.2
Vaadin Flow 25.0.7 via com.vaadin:vaadin-quarkus-extension
LangChain4j via quarkus-langchain4j-openai

The complete example is available on GitHub.
Project Setup
The easiest way to set up a Quarkus project with the right extensions is via code.quarkus.io. Select the following extensions:
Vaadin Flow (com.vaadin:vaadin-quarkus-extension) — the Vaadin integration for Quarkus, including components, themes, and the Vaadin dev server
LangChain4j OpenAI (quarkus-langchain4j-openai) — AI service integration via LangChain4j
If you already have a running Quarkus project and want to add Vaadin, add the following property, bom configuration and dependency to your pom.xml:
<properties>
    <vaadin.version>25.0.7</vaadin.version>
</properties>

<dependencyManagement>
    <dependencies>
        <dependency>
            <groupId>com.vaadin</groupId>
            <artifactId>vaadin-bom</artifactId>
            <version>${vaadin.version}</version>
            <type>pom</type>
            <scope>import</scope>
        </dependency>
    </dependencies>
</dependencyManagement>

<dependencies>
    <dependency>
        <groupId>com.vaadin</groupId>
        <artifactId>vaadin-quarkus-extension</artifactId>
        <version>${vaadin.version}</version>
    </dependency>
</dependencies>
<!-- For the AI integration, add the LangChain4j OpenAI extension: -->
<dependency>
    <groupId>io.quarkiverse.langchain4j</groupId>
    <artifactId>quarkus-langchain4j-openai</artifactId>
</dependency>
Finally, configure your OpenAI model and API key in application.properties:
quarkus.langchain4j.openai.api-key=your-api-key-here

quarkus.langchain4j.openai.chat-model.model-name=gpt-4o-mini
Your First Vaadin View
Let’s create our first Vaadin view to verify everything is wired correctly. We’ll start with a minimal example — a simple class called AiChatView that extends VerticalLayout, mapped to the application root via @Route(”“):
@Route(”“)
public class AiChatView extends VerticalLayout {
    public AiChatView() {
        add(”Hello World”);
    }
}
Start the application with ./mvnw quarkus:dev and open http://localhost:8080 in the browser. You should see a plain “Hello World” text rendered in the browser. That’s all it takes to get a Vaadin view running inside Quarkus.
Building the AI Chat UI
Now let’s replace the “Hello World” with a real chat interface. Vaadin provides ready-made components for exactly this use case: MessageList to display the conversation, MessageInput for the user’s input, and Scroller to keep the view anchored to the latest message.
The AI Service
Next, we define the AI service interface. LangChain4j’s @RegisterAiService annotation tells Quarkus to generate the implementation at build time, wiring it to the configured OpenAI model automatically. The chat method returns a Multi<String> — a reactive stream of tokens that arrive one by one as the model generates its response:
@SessionScoped
@RegisterAiService
public interface AiChatService {
    Multi<String> chat(@MemoryId Object chatId, @UserMessage String message);
}
The @MemoryId parameter tells LangChain4j which conversation history to attach to this request. To make that work, provide a ChatMemoryProvider bean that stores a MessageWindowChatMemory per session:
@ApplicationScoped
public class ChatMemoryProviderBean implements ChatMemoryProvider {
    private final Map<Object, MessageWindowChatMemory> memories = new ConcurrentHashMap<>();
    @Override
    public MessageWindowChatMemory get(Object memoryId) {
        return memories.computeIfAbsent(memoryId, id ->
                MessageWindowChatMemory.withMaxMessages(20));
    }
}
Note the scope difference: AiChatService is @SessionScoped — one instance per browser session — while ChatMemoryProviderBean is @ApplicationScoped, as it manages memory across all sessions in a single map.
The Chat View
With the service in place, we can build the view. The AiChatView injects AiChatService via CDI and uses Vaadin’s messaging components to display the conversation:
@Route(”“)
public class AiChatView extends VerticalLayout {
    private final MessageList messageList;
    private final Scroller scroller;
    @Inject
    AiChatService chatAiService;

    public AiChatView() {
        setSizeFull();
        messageList = new MessageList();
        messageList.setMarkdown(true);
        scroller = new Scroller(messageList);
        scroller.setSizeFull();
        var messageInput = new MessageInput();
        messageInput.setWidthFull();
        messageInput.addSubmitListener(this::onSubmit);
        add(scroller, messageInput);
        expand(scroller);
    }

    private void onSubmit(MessageInput.SubmitEvent event) {
        var ui = event.getSource().getUI().orElseThrow();
        var question = event.getValue();
        var userMsg = new MessageListItem(question, Instant.now(), “You”);
        userMsg.setUserColorIndex(0);
        messageList.addItem(userMsg);
        var assistantMsg = new MessageListItem(”“, Instant.now(), “Assistant”);
        assistantMsg.setUserColorIndex(1);
        messageList.addItem(assistantMsg);
// Each browser tab gets its own chat memory
  var memoryId = ui.getUIId();
        chatAiService.chat(memoryId, question).subscribe()
                .with(token -> ui.access(() -> {
                    assistantMsg.appendText(token);
                    scroller.scrollToBottom();
                }));
        scroller.scrollToBottom();
    }
}
A few things worth pointing out here. The MessageList is wrapped in a Scroller so the conversation history remains fully accessible even as it grows beyond the visible area in the browser window. Markdown rendering is enabled on the MessageList so the model’s formatted responses — code blocks, bullet points, bold text — are displayed correctly.
When the user submits a message, the method onSubmit adds the user’s message and an empty assistant message to the list immediately. Using a method reference to bind onSubmit to the MessageInput keeps the code clean and the component setup easy to follow. The onSubmit method also fills the assistant message token by token as the model streams its response. Because the streaming callback runs on a background thread, all UI updates must happen inside ui.access() — this is Vaadin’s Push mechanism for safely accessing the UI from outside the request thread.
Enabling Server Push
Before ui.access() can work, we need to enable server push in Vaadin. Create a configuration class that implements AppShellConfigurator and annotate it with @Push:
@Push
@StyleSheet(Aura.STYLESHEET)
public class VaadinConfig implements AppShellConfigurator {
}
This tells Vaadin to keep an open connection to the browser so the server can push UI updates at any time — essential for a streaming response. The @StyleSheet(Aura.STYLESHEET) annotation applies the base theme globally, making it available to all components across the application.
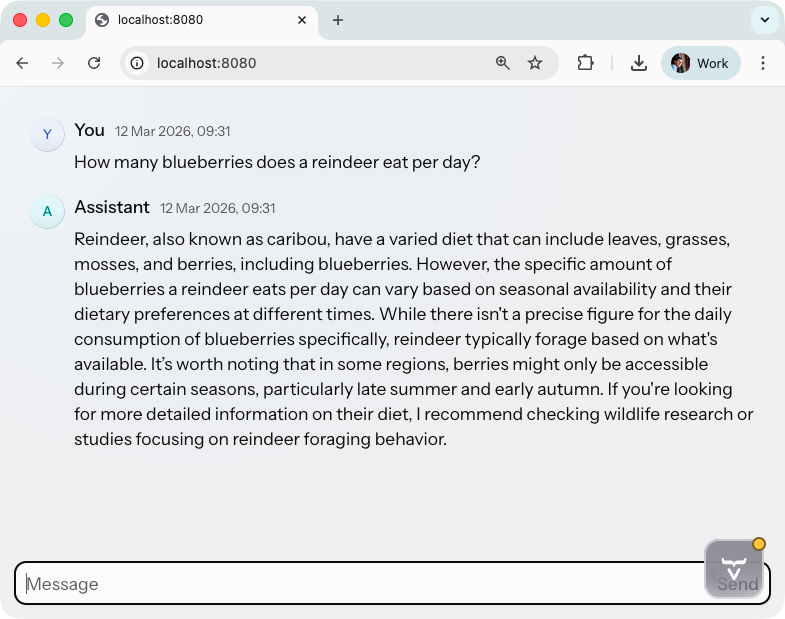
Try it out
With the application running, open http://localhost:8080. Type a question into the input field and submit it. You should see your message appear immediately in the MessageList, followed by the assistant’s response arriving token by token. The view scrolls automatically to keep the latest content visible.
Conclusion
In just a few steps, we built a fully functional, streaming AI chat interface as a modern web application — entirely in Java. We set up a Quarkus project with Vaadin and LangChain4j, created our first Vaadin view, defined a reactive AI service, and wired everything together with server push to deliver a smooth token-by-token chat experience in the browser.
If you want to dive deeper into the technologies covered in this tutorial, here are the official resources:
The complete code for this tutorial is available on GitHub.