

Vaadin Meets Quarkus: Build Modern Java UIs Without Touching JavaScript
A hands-on guide to creating fast, component-driven web apps in pure Java using Vaadin Flow and Quarkus.


Vaadin is one of those technologies you hear about every few years, usually followed by a quiet “Wait… that’s still around?” Yes, it is. And it has evolved into a surprisingly modern, productive option for building rich UIs in pure Java. No JavaScript framework churn. No build pipeline drama. No CSS reset wars. Just components, layouts, and event listeners running on the server.
And here’s the twist many Quarkus developers don’t realize: Quarkus Dev UI uses Vaadin under the hood.
If you’ve opened the Dev UI and thought “Wow, this feels polished for something I didn’t install”, that’s Vaadin at work. It’s all server-driven, it’s type-safe, and it scales from tiny admin panels to full business applications.
So I wanted to explore the obvious next step: how do you use Vaadin inside your own Quarkus applications?
This tutorial is a practical, hands-on answer. We’ll build a small task manager using Quarkus, Vaadin Flow, and Panache. You’ll get a feel for how Vaadin handles UI complexity without pulling you into frontend chaos.
Because let’s be honest: while frontend tech is impressive, modern web development can feel like assembling IKEA furniture with instructions written in three competing JavaScript frameworks. My personal tolerance for “just install these eight npm plugins and configure Webpack” is low. Vaadin lets me stay in Java where I’m happy.
If that resonates with you, you’re in the right place. Let’s build something real.
Prerequisites & Versions
You need:
Java 21 (recommended for current Quarkus 3.x)
Maven 3.8.6+
Node.js 18+ is helpful, but Vaadin can also manage a compatible Node automatically in dev mode
A modern browser
We’ll use:
Quarkus 3.x (generated by the CLI at create time; current latest is 3.30.1)
Vaadin Flow via
com.vaadin:vaadin-quarkus-extension(latest shown in the Quarkus registry is 24.9.6 at the time of writing)
The exact Vaadin version will be managed by the extension; you can pin it in your pom.xml later if needed.
Bootstrapping the Quarkus + Vaadin Project
Start with the complete example in my GitHub repository or, ff you have the Quarkus CLI installed:
quarkus create app com.example:vaadin-task-manager \
    --extension='com.vaadin:vaadin-quarkus-extension,rest'
cd vaadin-task-manager
This gives you a standard Quarkus project with a simple REST endpoint and a landing page.
Run dev mode:
quarkus devOpen http://localhost:8080. You should still see the Quarkus “Getting started” page. Vaadin is now wired in; we’ll add our first view next.
Understanding the Project Layout
Key parts of the project:
src/main/java/com/example
Where all our Quarkus and Vaadin Java code lives.src/main/resources/application.properties
Configuration for Quarkus, Vaadin, and the datasource.frontend/
Vaadin’s default place for client-side resources (CSS, icons, etc.). The folder will be created when needed by Vaadin tooling.
Quarkus dev mode (quarkus:dev) gives you live reload. Every time you edit Java or CSS, the app is recompiled and the browser reloads automatically.
Your First Vaadin View
We’ll replace Quarkus’ default REST landing page with a Vaadin UI.
Create a simple “Hello Vaadin” view
Create src/main/java/com/example/ui/HelloView.java:
package com.example.ui;

import com.vaadin.flow.component.button.Button;
import com.vaadin.flow.component.notification.Notification;
import com.vaadin.flow.component.orderedlayout.VerticalLayout;
import com.vaadin.flow.component.textfield.TextField;

public class HelloView extends VerticalLayout {

    public HelloView() {
        setSizeFull();
        setPadding(true);
        setSpacing(true);

        TextField name = new TextField(”Your name”);
        Button sayHello = new Button(”Say hello”);

        sayHello.addClickListener(event -> {
            String value = name.getValue();
            if (value == null || value.isBlank()) {
                Notification.show(”Please enter a name”);
            } else {
                Notification.show(”Hello “ + value + “ 👋”);
            }
        });

        add(name, sayHello);
    }
}
Oops, we forgot the @Route and @PageTitle. Add them on the class:
import com.vaadin.flow.router.PageTitle;
import com.vaadin.flow.router.Route;

@Route(”“)
@PageTitle(”Hello Vaadin”)
    // ...
}
What’s happening
@Route(”“)maps this view to/. Vaadin registers this route and handles incoming HTTP requests.VerticalLayoutarranges components vertically.The button’s click listener runs on the server. Vaadin takes care of syncing state and updating the browser using its server-side rendering model.
Restart dev mode if needed:
quarkus devOpen http://localhost:8080:
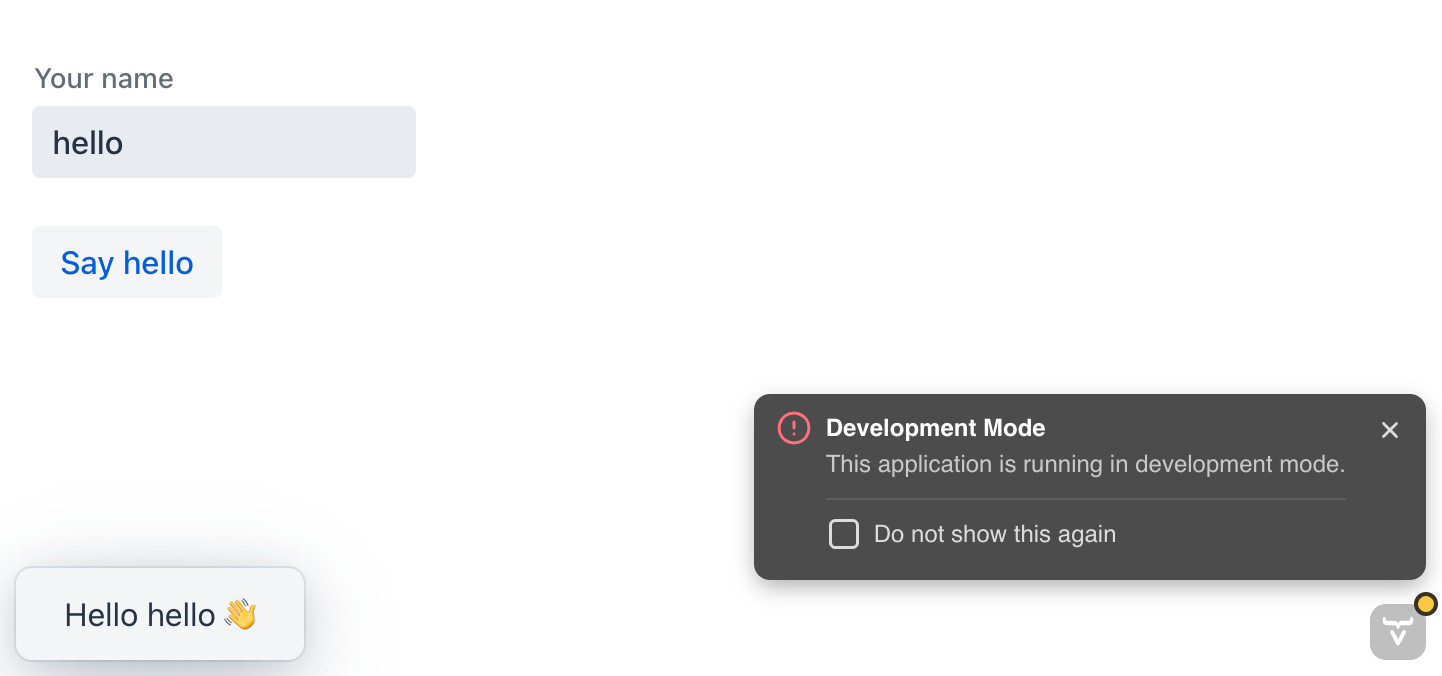
You should see your text field and button.
Typing a name and clicking “Say hello” shows a Vaadin notification.
If you see the Quarkus REST landing page instead, make sure:
HelloViewis compiled.The package is on the classpath (
com.example.uiis fine).@Route(”“)is present.
Part 2: Data Layer with Panache & H2
Now we give our app a real domain: tasks.
Add Panache & H2 dependencies
Add these extensions:
quarkus ext add 'hibernate-orm-panache,jdbc-h2'This adds:
quarkus-hibernate-orm-panachefor simplified JPA entities/repositories.quarkus-jdbc-h2for an in-memory H2 database.
Configure H2 and Hibernate
Edit src/main/resources/application.properties:
# Datasource configuration
quarkus.datasource.db-kind=h2
quarkus.datasource.jdbc.url=jdbc:h2:mem:tasks;DB_CLOSE_DELAY=-1;DB_CLOSE_ON_EXIT=FALSE

# Hibernate ORM
quarkus.hibernate-orm.schema-management.strategy=drop-and-create
quarkus.hibernate-orm.log.sql=true
This gives you an in-memory database recreated on every restart. Perfect for a beginner tutorial.
Create the Task entity
Create src/main/java/com/example/task/Task.java:
package com.example.task;

import java.time.LocalDate;

import io.quarkus.hibernate.orm.panache.PanacheEntity;
import jakarta.persistence.Column;
import jakarta.persistence.Entity;

@Entity
public class Task extends PanacheEntity {

    @Column(nullable = false)
    public String title;

    @Column(length = 1024)
    public String description;

    public LocalDate dueDate;

    public boolean done;
}
Notes:
PanacheEntitygives you an auto-generatedidfield and common operations likelistAll()andfindById()out of the box.Fields are public; Panache handles persistence logic. This is normal in Panache land and keeps entity code minimal.
Create a TaskService
Create src/main/java/com/example/task/TaskService.java:
package com.example.task;

import java.time.LocalDate;
import java.util.List;

import io.quarkus.panache.common.Sort;
import jakarta.enterprise.context.ApplicationScoped;
import jakarta.transaction.Transactional;

@ApplicationScoped
public class TaskService {

    public List<Task> findAll() {
        return Task.listAll(Sort.by(”id”).descending());
    }

    public long countOpen() {
        return Task.count(”done = ?1”, false);
    }

    public long countDone() {
        return Task.count(”done = ?1”, true);
    }

    @Transactional
    public Task create(String title, String description, LocalDate dueDate) {
        Task task = new Task();
        task.title = title;
        task.description = description;
        task.dueDate = dueDate;
        task.done = false;
        task.persist();
        return task;
    }

    @Transactional
    public Task toggleDone(Long id) {
        Task task = Task.findById(id);
        if (task == null) {
            return null;
        }
        task.done = !task.done;
        return task;
    }

    @Transactional
    public void delete(Long id) {
        Task.deleteById(id);
    }
}
Here we use CDI (@ApplicationScoped) and Quarkus transactions (@Transactional). CDI integration is a first-class part of Vaadin-with-Quarkus setups.
Part 3: Building the Task Manager UI
Now we connect Vaadin UI components to our TaskService.
Replace HelloView with TaskView
Delete the HelloView.java from earlier and create src/main/java/com/example/ui/TaskView.java:
package com.example.ui;

import java.time.LocalDate;

import com.example.task.Task;
import com.example.task.TaskService;
import com.vaadin.flow.component.button.Button;
import com.vaadin.flow.component.button.ButtonVariant;
import com.vaadin.flow.component.datepicker.DatePicker;
import com.vaadin.flow.component.grid.Grid;
import com.vaadin.flow.component.grid.GridVariant;
import com.vaadin.flow.component.notification.Notification;
import com.vaadin.flow.component.orderedlayout.HorizontalLayout;
import com.vaadin.flow.component.orderedlayout.VerticalLayout;
import com.vaadin.flow.component.textfield.TextArea;
import com.vaadin.flow.component.textfield.TextField;
import com.vaadin.flow.router.PageTitle;
import com.vaadin.flow.router.Route;

import jakarta.inject.Inject;

@Route(”“)
@PageTitle(”Tasks”)
public class TaskView extends VerticalLayout {

    private final TaskService taskService;

    private final Grid<Task> grid = new Grid<>(Task.class, false);

    private final TextField title = new TextField(”Title”);
    private final TextArea description = new TextArea(”Description”);
    private final DatePicker dueDate = new DatePicker(”Due date”);
    private final Button add = new Button(”Add task”);

    @Inject
    public TaskView(TaskService taskService) {
        this.taskService = taskService;

        setSizeFull();
        setPadding(true);
        setSpacing(true);

        configureForm();
        configureGrid();

        HorizontalLayout formLayout = new HorizontalLayout(title, description, dueDate, add);
        formLayout.setWidthFull();
        formLayout.setAlignItems(Alignment.END);

        add(formLayout, grid);

        refreshGrid();
    }

    private void configureForm() {
        title.setRequiredIndicatorVisible(true);
        title.setWidth(”200px”);

        description.setWidth(”300px”);
        description.setMaxLength(255);

        dueDate.setValue(LocalDate.now());

        add.addThemeVariants(ButtonVariant.LUMO_PRIMARY);
        add.addClickListener(event -> saveTask());
    }

    private void configureGrid() {
        grid.addColumn(task -> task.id).setHeader(”ID”).setAutoWidth(true);
        grid.addColumn(task -> task.title).setHeader(”Title”).setFlexGrow(2);
        grid.addColumn(task -> task.dueDate != null ? task.dueDate : “”).setHeader(”Due”);
        grid.addColumn(task -> task.done ? “Done” : “Open”).setHeader(”Status”);

        grid.addComponentColumn(task -> {
            Button toggle = new Button(task.done ? “Reopen” : “Done”);
            toggle.addClickListener(click -> {
                taskService.toggleDone(task.id);
                refreshGrid();
            });
            return toggle;
        }).setHeader(”Toggle”);

        grid.addComponentColumn(task -> {
            Button delete = new Button(”Delete”);
            delete.addThemeVariants(ButtonVariant.LUMO_ERROR);
            delete.addClickListener(click -> {
                taskService.delete(task.id);
                refreshGrid();
            });
            return delete;
        }).setHeader(”Actions”);

        grid.addThemeVariants(GridVariant.LUMO_ROW_STRIPES);
        grid.setSizeFull();
    }

    private void saveTask() {
        if (title.isEmpty()) {
            Notification.show(”Title is required”);
            return;
        }

        taskService.create(title.getValue(), description.getValue(), dueDate.getValue());
        title.clear();
        description.clear();
        dueDate.setValue(LocalDate.now());
        refreshGrid();
    }

    private void refreshGrid() {
        grid.setItems(taskService.findAll());
    }
}
Key points:
CDI injection works directly in Vaadin views (
@Injectconstructor).All CRUD operations happen on the server; Vaadin sends events over the wire and updates the DOM automatically.
Grid<Task>binds strongly to your entity type; you can mix text columns and component columns.
Verify
With dev mode running:
Open http://localhost:8080
Add a few tasks.
Click “Done” to toggle status.
Click “Delete” to remove tasks.
Expected:
The grid updates immediately after each action.
The database persists tasks until you restart dev mode (because H2 is in-memory).
Part 4: Basic Styling
Let’s add one minimal CSS file to make things less ugly.
Create frontend/styles.css:
:root {
    --app-max-width: 900px;
}

body {
    margin: 0;
}

.tasks-view-root {
    max-width: var(--app-max-width);
    margin: 0 auto;
    padding: var(--lumo-space-m);
}

.tasks-view-root vaadin-grid {
    height: 400px;
}
Update the view to use that class and import the stylesheet.
At the top of TaskView:
import com.vaadin.flow.component.dependency.CssImport;Add the annotation:
@Route(”“)
@PageTitle(”Tasks”)
@CssImport(”./styles.css”)
public class TaskView extends VerticalLayout {
    // ...
And in the constructor, right after setSpacing(true);:
addClassName(”tasks-view-root”);Vaadin’s dev mode will pick up frontend/styles.css, bundle it, and apply it to the page.
Verify:
The content is centered with padding.
The grid has a fixed visible height.
Part 5: Multiple Views & Navigation
Now we add a second view showing some basic statistics and a simple navigation layout using AppLayout.
Create a Main Layout with a menu
Create src/main/java/com/example/ui/MainLayout.java:
package com.example.ui;

import com.vaadin.flow.component.applayout.AppLayout;
import com.vaadin.flow.component.applayout.DrawerToggle;
import com.vaadin.flow.component.html.H1;
import com.vaadin.flow.component.html.Nav;
import com.vaadin.flow.component.html.Span;
import com.vaadin.flow.component.orderedlayout.VerticalLayout;
import com.vaadin.flow.router.RouterLink;
import com.vaadin.flow.theme.lumo.LumoUtility;

public class MainLayout extends AppLayout {

    public MainLayout() {
        createHeader();
        createDrawer();
    }

    private void createHeader() {
        H1 logo = new H1(”Task Manager”);
        logo.addClassNames(
                LumoUtility.FontSize.LARGE,
                LumoUtility.Margin.NONE
        );

        var header = new com.vaadin.flow.component.orderedlayout.HorizontalLayout(
                new DrawerToggle(), logo
        );
        header.setWidthFull();
        header.setPadding(true);
        header.setAlignItems(com.vaadin.flow.component.orderedlayout.FlexComponent.Alignment.CENTER);

        addToNavbar(header);
    }

    private void createDrawer() {
        RouterLink tasksLink = new RouterLink(”Tasks”, TaskView.class);
        RouterLink statsLink = new RouterLink(”Statistics”, StatsView.class);

        VerticalLayout menu = new VerticalLayout(
                new Span(”Views”),
                tasksLink,
                statsLink
        );
        menu.setPadding(true);
        menu.setSpacing(false);

        addToDrawer(menu);
    }
}
We’re using Vaadin’s Lumo utility classes to avoid writing more custom CSS.
Attach TaskView to the layout
Change the @Route on TaskView:
@Route(value = “”, layout = MainLayout.class)
@PageTitle(”Tasks”)
@CssImport(”./styles.css”)
public class TaskView extends VerticalLayout {
    // ...
Now the tasks view will render inside MainLayout’s AppLayout.
Create a statistics view
Create src/main/java/com/example/ui/StatsView.java:
package com.example.ui;

import com.example.task.TaskService;
import com.vaadin.flow.component.html.H2;
import com.vaadin.flow.component.html.Paragraph;
import com.vaadin.flow.component.orderedlayout.VerticalLayout;
import com.vaadin.flow.component.progressbar.ProgressBar;
import com.vaadin.flow.router.PageTitle;
import com.vaadin.flow.router.Route;

import jakarta.inject.Inject;

@Route(value = “stats”, layout = MainLayout.class)
@PageTitle(”Task Statistics”)
public class StatsView extends VerticalLayout {

    private final TaskService taskService;

    @Inject
    public StatsView(TaskService taskService) {
        this.taskService = taskService;

        setSizeFull();
        setPadding(true);
        setSpacing(true);

        H2 heading = new H2(”Task Statistics”);

        long open = taskService.countOpen();
        long done = taskService.countDone();
        long total = open + done;

        Paragraph summary = new Paragraph(
                “Open: “ + open + “ • Done: “ + done + “ • Total: “ + total);

        ProgressBar completion = new ProgressBar(0, 1, total == 0 ? 0 : (double) done / total);
        completion.setWidth(”300px”);

        add(heading, summary, completion);
    }
}
Now the statistics view uses the same TaskService via CDI. When you navigate here, counts are computed from the database.
Verify navigation
With dev mode running:
Open http://localhost:8080.
Use the drawer/menu toggle to open the navigation.
Click “Statistics”.
Expected:
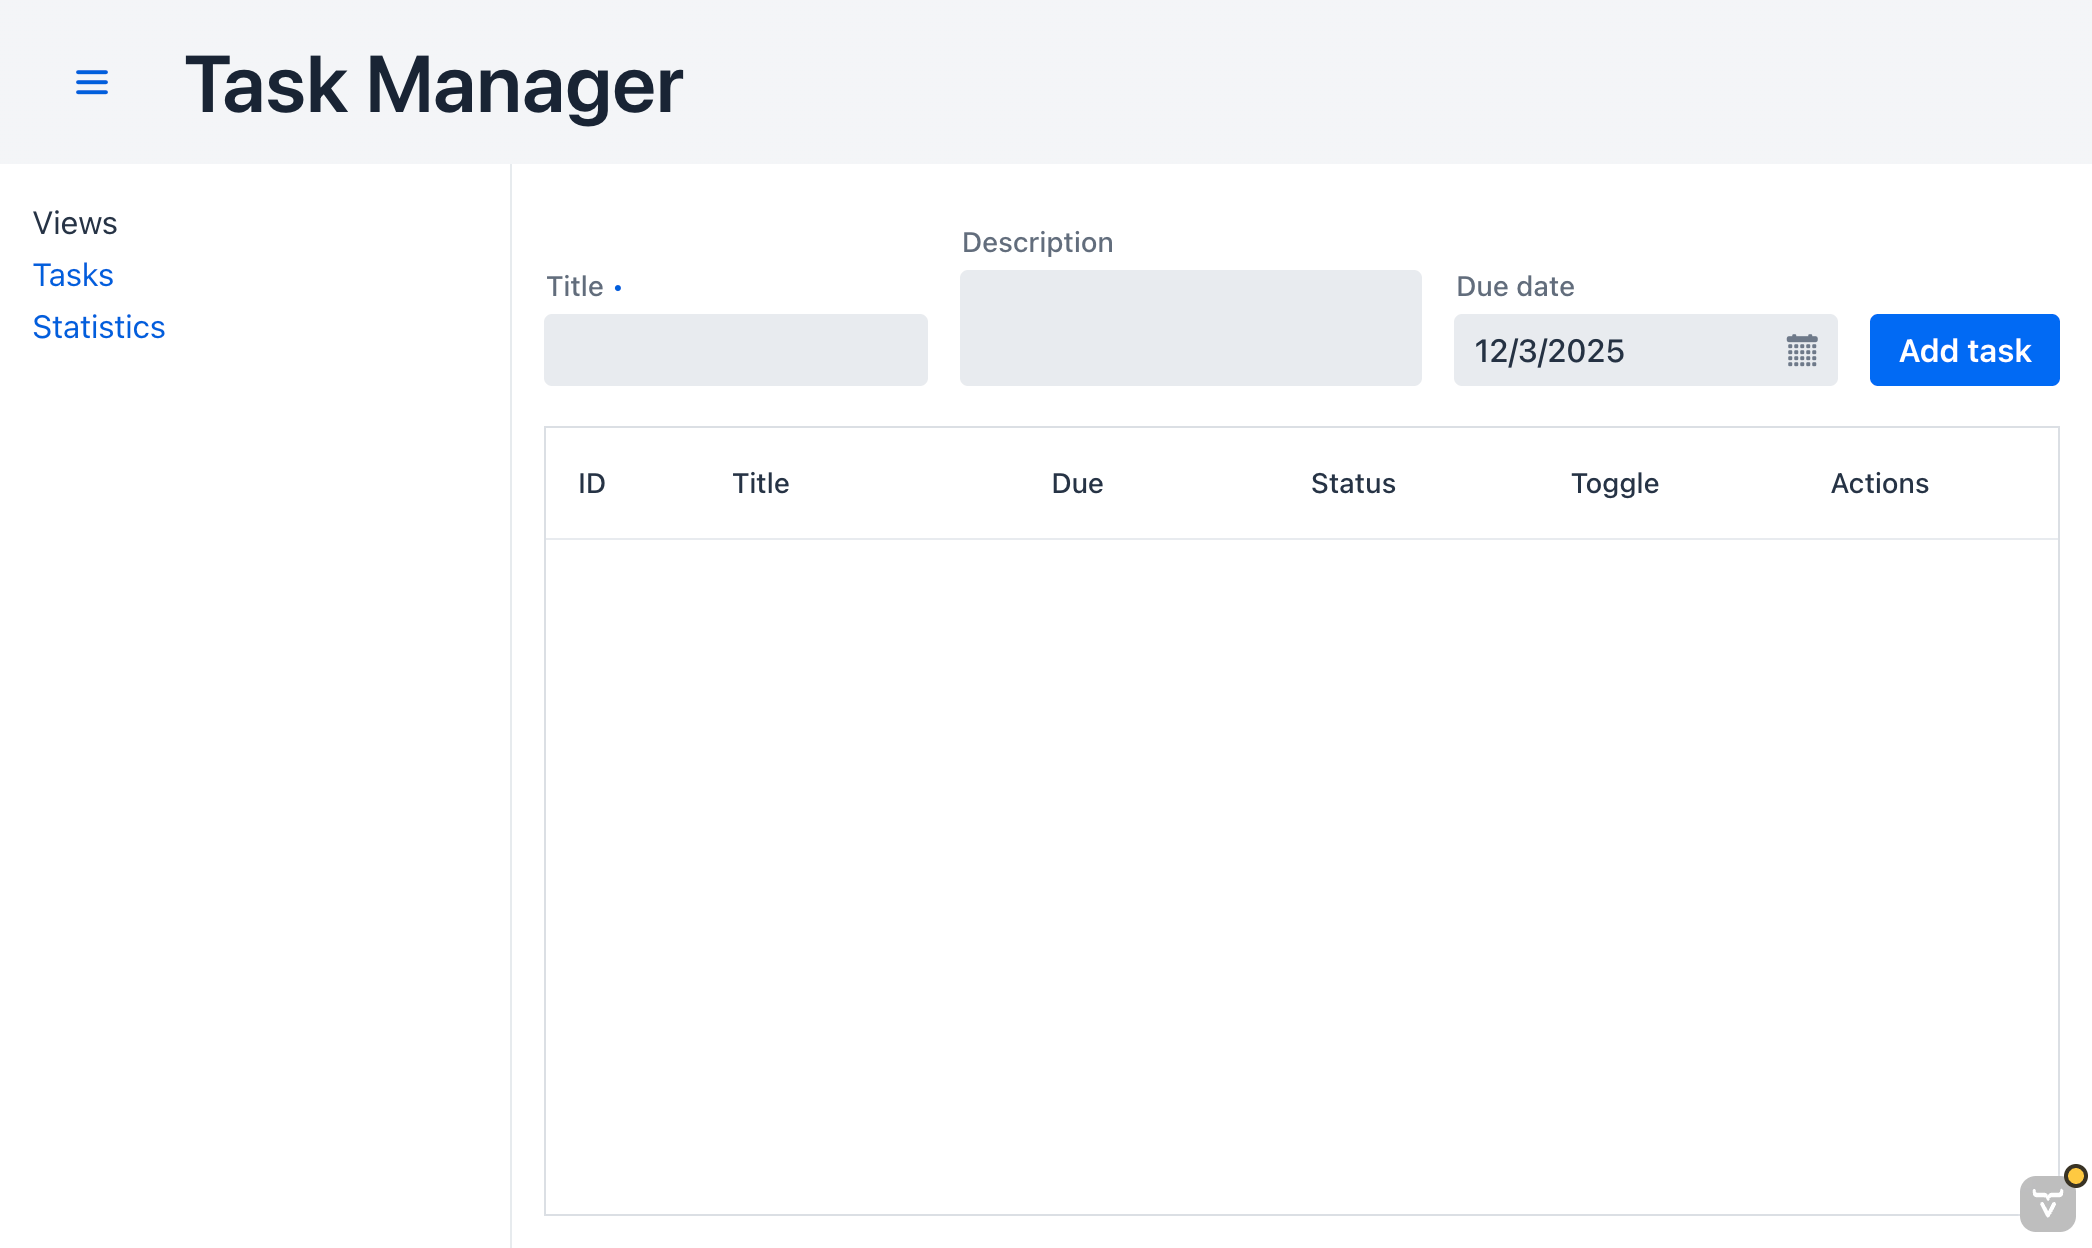
The statistics view shows your open/done/total counts.
The progress bar reflects completion percentage.
How This Works Architecturally
This simple app already shows the core Vaadin + Quarkus patterns you can reuse in enterprise projects:
Server-side rendering & state
Vaadin Flow keeps UI state on the server and keeps the browser in sync via a lightweight protocol; you write strongly typed Java code instead of JavaScript.Quarkus dev mode & fast reload
Quarkus dev mode and Vaadin dev tools collaborate to give hot reload of Java and frontend resources.CDI end-to-end
The same CDI container powers both your Vaadin views and your backend services. Views can inject any CDI bean (@ApplicationScoped,@RequestScoped, etc.).Panache for persistence
Panache simplifies JPA so you can focus on business logic (Task.listAll(),Task.count(...)) instead of verbose entity managers.Type-safe Java only
This entire tutorial uses pure Java; no separate JS/TS or HTML templates.
Where To Go Next
Ideas to extend this learning experience:
Add validation and binder-based forms in Vaadin for better user feedback.
Use
@Routeparameters to open a specific task directly in edit mode.Add pagination and filters to the grid.
Take a look at Quarkus testing and Vaadin UI testing (see Vaadin’s Quarkus UI unit tests docs).
Add basic authentication via Keycloak and protect routes.
You now have a working, end-to-end Vaadin + Quarkus task manager, with a clean separation between UI and service layer, and a stack that stays comfortably in Java.
Great article. I've a fan of the Vaadin concept and currently looking to justify it, but the user sessions issues need to be address at conception of the project. Heavy, sticky sessions could be an issue for a large scale system. Replicated sessions is a heavy lift. Better to plan that out before you fall in love. ;-)
It doesn't happen often to me to have to develop UIs but, when it happens, I don't have to look too far to find the right frontend library, since Java, with its enterprise grade extensions, provides the ideal tool: Jakarta Faces.
And if, additionally, you're a Quarkus developer, then the Prime Faces extension for Quarkus is perfect for you.
Of course, the frontend technology is nowadays extremly sophisticated, so people will use a large diversity of libraries for their UIs, like Angular, Vue.js, React.js, etc.
Others will prefer Java only solutions like Vaadin, perhaps Apache Wicket and some others will even dig up for Struts.
However, the most natural UI technology for the Java enterprise grade developer is, IMHO, Jakarta Faces, with its Quarkus extensions.