


This tutorial has been sitting here since months. I had a Quarkus application generating an Apple Wallet pass, and I couldn't get the thing to display locally. At one point, Simulator told me that it couldn't open files in the Pass format, which left me with a generated file and very little idea of what to do with it. I wasn't getting much further with the logs either, and, well, I knew too little about Apple's tooling to understand which part I was getting wrong.
Then Apple released Pass Designer beta, and I came back to the example. The application runs on a Mac and lets you edit a pass while seeing how it appears on an iPhone or Apple Watch. Since it can open an unsigned template, I could finally look at the card and change its layout without first completing the certificate setup for installing it in Wallet.
The card I used is a membership card for The Main Thread, generated by a small Quarkus application that takes the member's name, tier, and ID. On the Java side, jPasskit gives us builders for the pass fields and barcode, so we can describe the card much like any other object in a backend service. From there, we serialize the data, add the images, and open the result in Designer to see how Apple presents it.
What we build
A
pass.jsondescribing The Main Thread membership card, with a poster layout and a generic fallback.A Quarkus endpoint that packages the JSON and artwork as a Pass Designer template.
A local preview showing the requested member name, tier, and QR code.
You'll request the card through GET /wallet/membership/{memberId}/template, passing the member's name and tier as query parameters. The response is a ZIP containing an editable .pkpasstemplate bundle, so changing those parameters and downloading it again gives you another card to open in Designer.
What you need
For the preview, you need a Mac with macOS 27 or later because that's where Pass Designer runs; the Java application itself can also run on Linux. Download Designer by signing in with an Apple Account and completing the free developer registration if you're asked. That account is enough for the preview, and the Java build and template download use the tools below:
JDK 21 to build and run the Quarkus application.
Quarkus 3.40.1 for the REST application and jPasskit 0.5.7 for the pass model.
Quarkus CLI if you generate the project from scratch. The repository already includes the Maven wrapper.
Pass Designer beta 1.0 (28) on a Mac with macOS 27 or later for the preview.
curlandunzipto download and extract the generated template.
Pass Designer is still in beta, so its template format and validation rules may change.
Start from the repo
The repository includes the Java code and artwork, together with a script that downloads the template and opens it in Designer. If you want to see the card before following the implementation, clone it here and jump to Preview in Pass Designer:
git clone https://github.com/myfear/the-main-thread.git
cd the-main-thread/quarkus-apple-wallet
If you prefer building it step by step, keep the repository available for the artwork and scripts while you generate the application below and add the Java classes.
What Pass Designer opens
A pass is the individual card displayed in Wallet, such as a boarding pass or a membership card. Our backend supplies its data and images, while Wallet renders them using one of Apple's layouts. So when we build the pass in Java, we're describing the fields and barcode that Apple will place on the card according to that layout.
To preview that content, Pass Designer opens a directory containing pass.json and the images, with a name ending in .pkpasstemplate. macOS treats this directory as a document, so you can open the whole bundle in the application rather than selecting its files individually. We wrap the directory in a ZIP for the HTTP download, and the helper script extracts it before opening Designer.
You may already have downloaded a .pkpass file when receiving a ticket or another card. That's the signed archive used for Wallet installation, containing the same kind of JSON and images along with a manifest and a signature. The Designer template holds the source data for that process, which is why we can use it to adjust the design before adding signing to the application.
Where jPasskit fits
jPasskit is an open-source Java library that models Apple's pass format. Its PKPass class represents pass.json, with nested builders for the fields, barcode, and layout, so the code should look familiar if you've used builders to assemble a response object. You supply the member data through those builders and serialize the completed object with Jackson, keeping Apple's JSON property names in the library's model.
For this application, I added the core jpasskit dependency and used Java's ZIP APIs to package the serialized JSON with the images. The REST endpoint returns those bytes as a download, so the request follows the usual path from parameters to a Java object and then to a response. The library also provides signing utilities that you can use when creating installable passes.
Since version 0.5.7 models the classic generic pass, I used Jackson to add Apple's newer posterGeneric layout to the serialized JSON. It takes the member data from the generic pass, which keeps both layouts on the same values when a request changes the name or tier.
Project setup
Create the Quarkus application with the REST and Jackson extensions for the endpoint and JSON handling. The --no-code option leaves the source directory ready for the classes we'll add below:
quarkus create app dev.themainthread:quarkus-apple-wallet \
  --extension=rest,rest-jackson \
  --java=21 \
  --no-code \
  -o=quarkus-apple-wallet \
  --package-name=dev.themainthread.wallet
If the CLI nests another directory, move the generated files up one level so pom.xml sits at quarkus-apple-wallet/pom.xml.
With the project in place, add the core jPasskit dependency to pom.xml. It comes from Maven Central and isn't managed by the Quarkus platform, so we specify its version here:
<dependency>
    <groupId>de.brendamour</groupId>
    <artifactId>jpasskit</artifactId>
    <version>0.5.7</version>
</dependency>
Pass template assets
With the Java dependencies added, we can look at the images that go alongside the pass data. I used The Main Thread's cream-and-charcoal design, with thin copper lines and a serif wordmark, and chose Apple's poster generic style for its artwork area on iOS and watchOS 27. A classic generic layout is included in the same document so earlier versions can display the member data as well.
That choice gives us room for the branding, while Apple's Wallet design guidance puts the member information and barcode in native fields. The images supply the artwork and logo, and Wallet reads the name, tier, ID, website, and QR payload from the JSON. Apple chooses the font and alignment for those fields, so you need to account for that when adapting an existing card design.
In my reference design, for example, the member name was large serif text in the middle of the card. The poster layout puts the name and tier in a translucent panel below the artwork, so I moved that information into the lower panel and kept the colors and copper lines around it. The text is light against the dark lower area, with the website and additional copy available in the pass details. For the generic fallback, I kept a simpler charcoal background around the same member data.
The repo ships these PNG assets under src/main/resources/pass-template/:
icon.png        (38×38)
icon@2x.png     (76×76)
icon@3x.png     (114×114)
logo.png             (160×50, light wordmark for the fallback)
logo@2x.png          (320×100)
logo@3x.png          (480×150)
primaryLogo@2x.png   (252×60, dark wordmark for the poster)
primaryLogo@3x.png   (378×90)
artwork@2x.png       (716×896)
artwork@3x.png       (1074×1344)
The different sizes come from Apple's use of points to describe the logical display size of an image. On a denser screen, the @2x and @3x files provide two or three pixels for each point, so the 38-point icon in the Pass Designer guide becomes a 76-pixel or 114-pixel square. Apple's Human Interface Guidelines specify a maximum primary logo of 126 by 30 points and poster artwork of 358 by 448 points. The wordmark already supplies the brand name in the image, so I omitted logoText from the pass data.
You can use the bundled PNGs directly, or change the source artwork and wordmarks in design/, where you'll also find the small thread-mark SVG. The exporter has a fixed list of the ten filenames above, so add the filename there as well if you introduce another image. After changing the image sources, use ImageMagick to rebuild the PNG scale variants:
./scripts/render-pass-assets.shWhen you open the updated template later, check Designer's Images panel for the dimensions and scale variants of any image you've replaced.
Configure the application
Alongside the images and member fields, a pass carries identifiers for its issuer. Apple uses passTypeIdentifier to identify the registered pass type and teamIdentifier to identify the issuing developer account. For a Designer preview, you can supply placeholders for both, so put these values and the organization name in src/main/resources/application.properties:
# Placeholder identities for unsigned Pass Designer previews, not Wallet installation.
pass.type-identifier=pass.dev.themainthread
pass.team-identifier=DEVTEAM01
pass.org-name=The Main Thread
On the Quarkus side, a typed configuration interface exposes those three settings to the Java classes, keeping the property names together under the same prefix:
package dev.themainthread.wallet;

import io.smallrye.config.ConfigMapping;

@ConfigMapping(prefix = "pass")
public interface PassConfig {

    String typeIdentifier();

    String teamIdentifier();

    String orgName();
}
These settings are read in both dev mode and the packaged application, so the preview keeps the same issuer values in either case. When you create an installable pass, replace the placeholder identifiers with the values from the Apple-issued signing certificate; they must match.
Serialize pass.json with jPasskit
jPasskit gives us the Java model, and Jackson turns it into the document Apple reads. I kept a dedicated ObjectMapper for this conversion and configured it to leave out null properties, so fields we haven't supplied are omitted from the JSON. This is also where we can extend the document with the newer poster layout before writing it to the template.
To add posterGeneric, we take the field nodes from the generic layout that jPasskit has already built. The member name and tier become poster primary fields, and the ID becomes a footer field, so a change to the member data is reflected in both presentations. By the way, Apple calls these JSON objects dictionaries in its documentation; here we're building one with Jackson's object and array nodes:
package dev.themainthread.wallet;

import com.fasterxml.jackson.annotation.JsonInclude;
import com.fasterxml.jackson.databind.ObjectMapper;
import com.fasterxml.jackson.databind.node.ArrayNode;
import com.fasterxml.jackson.databind.node.ObjectNode;
import de.brendamour.jpasskit.PKPass;
import jakarta.enterprise.context.ApplicationScoped;
import java.io.IOException;

@ApplicationScoped
public class PassJsonWriter {

    private final ObjectMapper objectMapper = new ObjectMapper()
            .setSerializationInclusion(JsonInclude.Include.NON_NULL);

    public String writePass(PKPass pass) throws IOException {
        ObjectNode document = objectMapper.valueToTree(pass);
        ObjectNode generic = (ObjectNode) document.get("generic");

        // jPasskit 0.5.7 models the legacy style, but not iOS 27's posterGeneric dictionary.
        ObjectNode poster = document.putObject("posterGeneric");
        poster.set("footerFields", generic.get("auxiliaryFields"));
        ArrayNode primary = poster.putArray("primaryFields");
        primary.addAll((ArrayNode) generic.get("primaryFields"));
        primary.addAll((ArrayNode) generic.get("secondaryFields"));
        poster.set("backFields", generic.get("backFields"));
        document.put("suppressHeaderDarkening", true);
        return objectMapper.writeValueAsString(document);
    }
}
Build the pass content
With the serializer in place, PassBuilderService can take the request parameters and build the generic membership model. Each PKField has a stable key, a visible label, and a value, which lets us put the member name under the same label each time while changing the name supplied by the request. The primary, secondary, and auxiliary groups determine placement in the classic layout, while back fields appear in the pass details. Once those fields and the barcode have been added, the completed object is passed to our JSON writer:
package dev.themainthread.wallet;

import de.brendamour.jpasskit.PKBarcode;
import de.brendamour.jpasskit.PKField;
import de.brendamour.jpasskit.PKPass;
import de.brendamour.jpasskit.enums.PKBarcodeFormat;
import de.brendamour.jpasskit.passes.PKGenericPass;
import jakarta.enterprise.context.ApplicationScoped;
import java.awt.Color;
import java.io.IOException;
import java.nio.charset.Charset;

@ApplicationScoped
public class PassBuilderService {

    private final PassConfig passConfig;
    private final PassJsonWriter passJsonWriter;

    PassBuilderService(PassConfig passConfig, PassJsonWriter passJsonWriter) {
        this.passConfig = passConfig;
        this.passJsonWriter = passJsonWriter;
    }

    public String buildPassJson(String memberId, String memberName, String tier) throws IOException {
        PKPass pass = PKPass.builder()
                .pass(PKGenericPass.builder()
                        .primaryFieldBuilder(PKField.builder()
                                .key("member-name")
                                .label("MEMBER")
                                .value(memberName))
                        .secondaryFieldBuilder(PKField.builder()
                                .key("tier")
                                .label("TIER")
                                .value(tier))
                        .auxiliaryFieldBuilder(PKField.builder()
                                .key("member-id")
                                .label("MEMBER ID")
                                .value(memberId))
                        .backFieldBuilder(PKField.builder()
                                .key("website")
                                .label("THE MAIN THREAD")
                                .value("https://www.the-main-thread.com/"))
                        .backFieldBuilder(PKField.builder()
                                .key("about")
                                .label("A HIGHER STANDARD FOR BUILDERS")
                                .value("Ideas. People. Better software. Ideas into progress."))
                        .backFieldBuilder(PKField.builder()
                                .key("demo")
                                .label("ABOUT THIS CARD")
                                .value("Tutorial demonstration. Not proof of a paid subscription or access entitlement.")))
                .barcodeBuilder(PKBarcode.builder()
                        .format(PKBarcodeFormat.PKBarcodeFormatQR)
                        .message(memberId)
                        .altText(memberId)
                        .messageEncoding(Charset.forName("utf-8")))
                .formatVersion(1)
                .passTypeIdentifier(passConfig.typeIdentifier())
                .serialNumber(memberId)
                .teamIdentifier(passConfig.teamIdentifier())
                .organizationName(passConfig.orgName())
                .description("The Main Thread Membership Card")
                .backgroundColor(Color.decode("#22272B"))
                .foregroundColor("rgb(245, 242, 235)")
                .labelColor("rgb(214, 173, 112)")
                .build();

        return passJsonWriter.writePass(pass);
    }
}
The barcode builder puts the member ID into the QR code, so scanning this example gives you TMT-0042. That ID belongs to the sample membership data, and the pass details identify the card as a tutorial demonstration as well.
Package the Designer template
Now we have the pass data, we can put it together with the images for the download. PassTemplateService writes them under TheMainThread.pkpasstemplate/ in a ZIP archive, using a ByteArrayOutputStream to assemble the response in memory. It reads the images from the classpath in both dev mode and the packaged JAR.
The generated JSON is written first, followed by the ten PNGs from the exporter's list. Before taking the byte array from the output stream, we close the ZIP so the archive is finished when the resource receives the bytes to send back to the client:
package dev.themainthread.wallet;

import jakarta.enterprise.context.ApplicationScoped;
import java.io.ByteArrayOutputStream;
import java.io.FileNotFoundException;
import java.io.IOException;
import java.io.InputStream;
import java.nio.charset.StandardCharsets;
import java.util.List;
import java.util.zip.ZipEntry;
import java.util.zip.ZipOutputStream;

@ApplicationScoped
public class PassTemplateService {

    private static final String BUNDLE = "TheMainThread.pkpasstemplate/";
    private static final List<String> IMAGES = List.of(
            "icon.png", "icon@2x.png", "icon@3x.png",
            "logo.png", "logo@2x.png", "logo@3x.png",
            "primaryLogo@2x.png", "primaryLogo@3x.png",
            "artwork@2x.png", "artwork@3x.png");

    private final PassBuilderService passBuilderService;

    PassTemplateService(PassBuilderService passBuilderService) {
        this.passBuilderService = passBuilderService;
    }

    public byte[] createTemplate(String memberId, String memberName, String tier) throws IOException {
        String passJson = passBuilderService.buildPassJson(memberId, memberName, tier);
        ByteArrayOutputStream output = new ByteArrayOutputStream();
        try (ZipOutputStream zip = new ZipOutputStream(output)) {
            zip.putNextEntry(new ZipEntry(BUNDLE + "pass.json"));
            zip.write(passJson.getBytes(StandardCharsets.UTF_8));
            zip.closeEntry();

            for (String image : IMAGES) {
                try (InputStream input = getClass().getClassLoader().getResourceAsStream("pass-template/" + image)) {
                    if (input == null) {
                        throw new FileNotFoundException("Missing pass image: " + image);
                    }
                    zip.putNextEntry(new ZipEntry(BUNDLE + image));
                    input.transferTo(zip);
                    zip.closeEntry();
                }
            }
        }
        return output.toByteArray();
    }
}
If an image from that list is missing, the request fails with an IOException naming the file. Use the name in the Quarkus log to check the resources under src/main/resources/pass-template/ before trying the download again.
Expose the template over REST
To expose that download, WalletResource reads the member parameters and passes them to the exporter. Once the ZIP has been created, the resource sets the download filename in Content-Disposition and returns the bytes with the content type application/zip, leaving extraction to the client:
package dev.themainthread.wallet;

import jakarta.ws.rs.DefaultValue;
import jakarta.ws.rs.GET;
import jakarta.ws.rs.Path;
import jakarta.ws.rs.PathParam;
import jakarta.ws.rs.Produces;
import jakarta.ws.rs.QueryParam;
import jakarta.ws.rs.core.Response;
import java.io.IOException;

@Path("/wallet")
public class WalletResource {

    private final PassTemplateService passTemplateService;

    WalletResource(PassTemplateService passTemplateService) {
        this.passTemplateService = passTemplateService;
    }

    @GET
    @Path("/membership/{memberId:[A-Za-z0-9_-]+}/template")
    @Produces("application/zip")
    public Response template(
            @PathParam("memberId") String memberId,
            @QueryParam("name") @DefaultValue("Main Thread Reader") String name,
            @QueryParam("tier") @DefaultValue("Member") String tier) throws IOException {
        byte[] templateBytes = passTemplateService.createTemplate(memberId, name, tier);

        return Response.ok(templateBytes)
                .header("Content-Disposition", "attachment; filename=\"main-thread-" + memberId
                        + ".pkpasstemplate.zip\"")
                .build();
    }
}
Preview in Pass Designer
To request a card, start Quarkus in dev mode from the module root, where pom.xml is located:
./mvnw quarkus:devLeave Quarkus running while you open another terminal in the same module directory. The helper script sends a request to the endpoint, downloads the template, and opens it in Designer:
./scripts/preview-pass-designer.shThe script extracts the template under target/designer-preview.*/TheMainThread.pkpasstemplate and prints that path before opening Designer. In the preview, I could finally see how the card was laid out: the artwork and QR code fill the upper area, with my name and the Founding Member tier in the lower panel. The member ID, TMT-0042, appears in the footer and below the barcode, so you can follow the values from the Java builder into the preview.
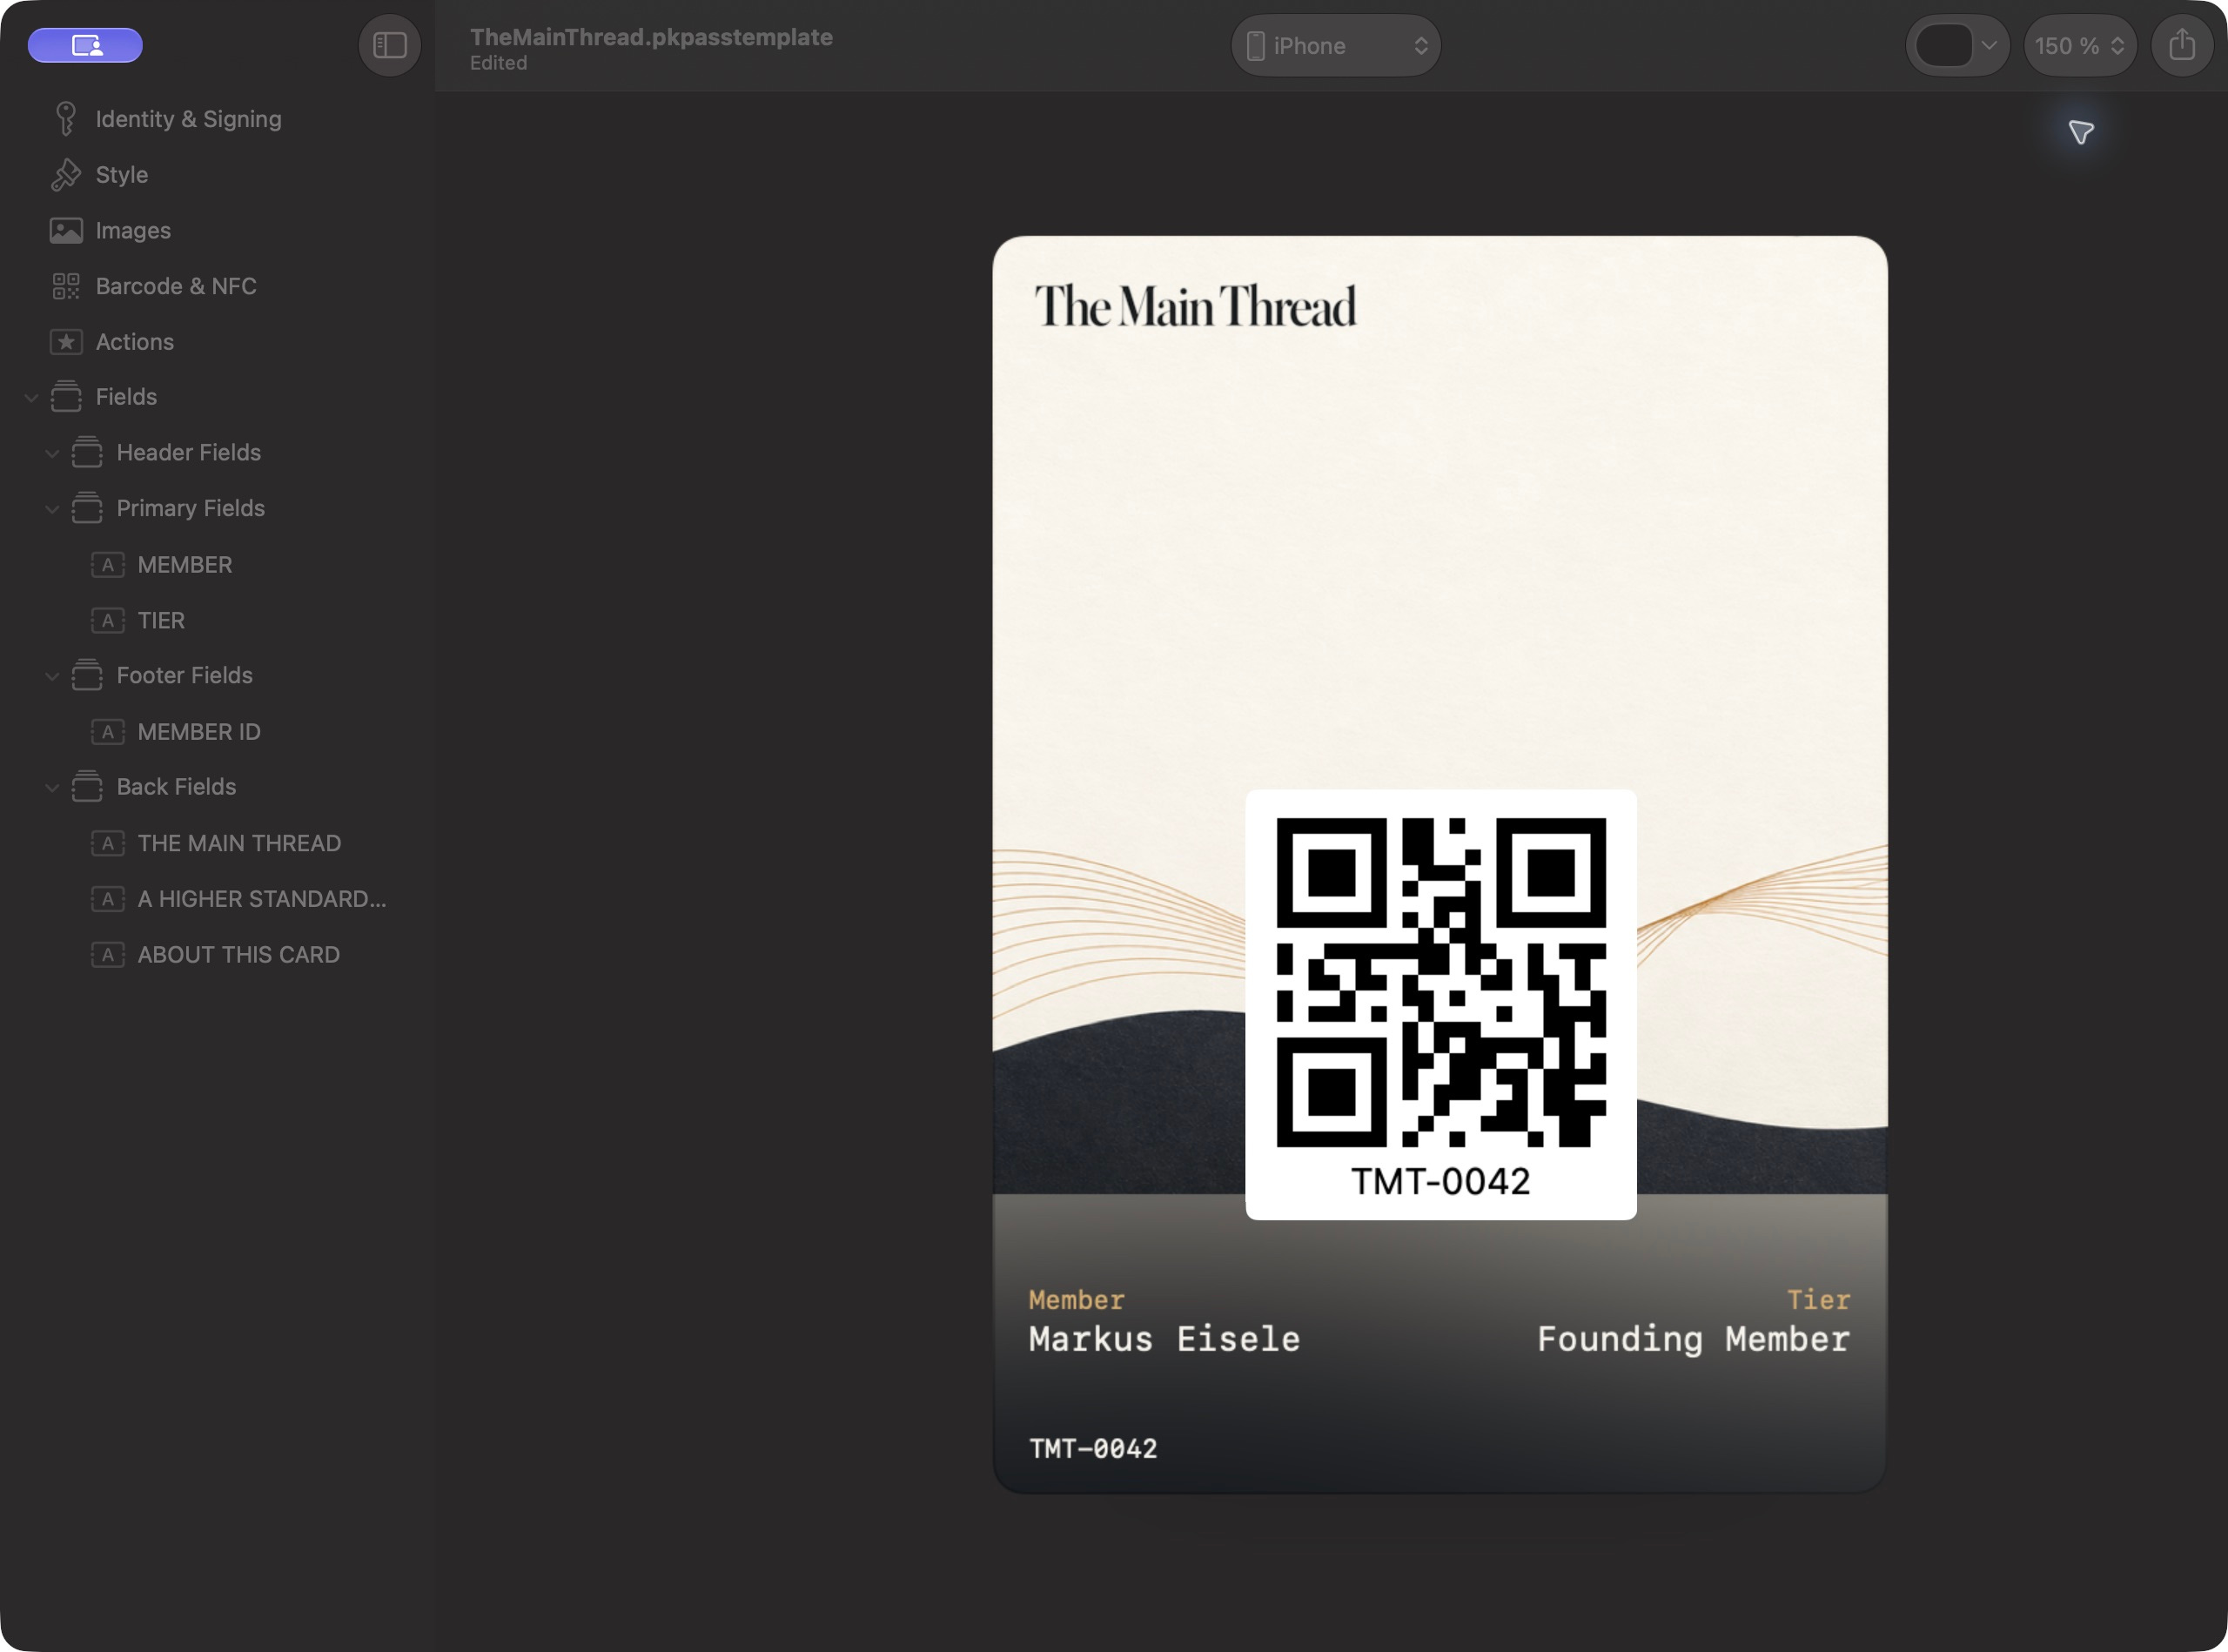
The generated template in Pass Designer 1.0 (28). The artwork carries the branding; Wallet renders the member fields and QR code.
While the card is open, check the Images row in the sidebar as well. It should be clear of warnings, and if a badge appears, opening the panel tells you which image needs attention. You can then change the image source, rebuild its scale variants, and download a new template to see the change.
If you want to change the member data in the request, you can run the download and extraction directly with the commands below. Each export gets a fresh directory, which keeps any edits you've made to an earlier copy intact:
preview_dir=$(mktemp -d "$PWD/target/designer-preview.XXXXXX")
curl -fS -o "$preview_dir/template.zip" \
  "http://localhost:8080/wallet/membership/TMT-0042/template?name=Markus+Eisele&tier=Founding+Member"
unzip -q "$preview_dir/template.zip" -d "$preview_dir"
open -a "Pass Designer" "$preview_dir/TheMainThread.pkpasstemplate"
Open the extracted .pkpasstemplate directory as a document in Designer; inside it are the eleven files we assembled, pass.json and ten PNGs. Then try changing name or tier in the URL and exporting another card, so you can see how the requested values appear in the same layout.
You can also edit the open document directly in Designer, which is convenient while adjusting the design. Just keep in mind that those changes belong to that particular copy: to include them in future exports, update the Java builder or source artwork as well. Keep any designs you want to retain outside target/, since a Maven clean can delete that directory. When you're finished, stop Quarkus with Ctrl+C; the exported document stays available in Designer.
From a preview to a real pass
Once you want to distribute the card, you'll need paid Apple Developer Program membership and a registered Pass Type ID with its Apple-issued certificate. Create a private key and certificate signing request, upload the request to Apple, and keep the key alongside the certificate Apple returns. The pass identifiers must then be changed from our placeholders to the values belonging to that certificate, and Apple's WWDR G4 intermediate certificate is included to supply the required certificate chain.
With those certificates available, add a signing step using jPasskit's signing utilities or OpenSSL. It creates manifest.json with the SHA-1 hashes of the pass files, then produces a detached PKCS#7 signature over that manifest. The JSON, images, manifest, and signature are zipped directly at the archive root, given the .pkpass extension, and served with application/vnd.apple.pkpass, as described in Apple's pass-building guide.
You can then open the signed download from Safari on an iPhone or in an iPhone Simulator started through Xcode and add it to Wallet. Xcode is Apple's development environment, and Simulator runs an iOS environment on your Mac with the same requirement for a trusted signing identity, so it rejects self-signed certificates too. Use the download route rather than Finder's Open With > Simulator command, and check the PassKit logs for certificate or identifier errors if installation fails. I haven't repeated that installation with a fresh certificate for this version of the example.
When things go wrong
Wrong document in Pass Designer - Extract the ZIP download and open the .pkpasstemplate bundle inside it, since that's the editable document Designer needs here. An old signed .pkpass is the installation archive.
Preview does not change - Each export is an independent copy, so changing Java code or artwork leaves the document already open in Designer unchanged. Regenerate the template and open the new path to see those changes.
Image warning in Designer - Open Images and check the dimensions and scale variants, using the bundled icons at 38, 76, and 114 pixels square as a reference. If the download itself fails before you get to Designer, check the Quarkus log for a missing image from the exporter's list.
Further reading
The full source is in quarkus-apple-wallet, with the Java model provided by jPasskit. For the Apple side, the guides cover Pass Designer and building a signed pass separately, so you can follow the design instructions first and return to signing when you need installation.
Conclusion
I can now change a field in Java, download the template, and see where it ends up in Apple's renderer, which is what I was missing when this tutorial first stopped. Moving the member name into Wallet's lower panel was easier to understand once I could look at the card and adjust the design around it. On the Java side, that leaves a small Quarkus endpoint with jPasskit describing the pass and Java packaging the JSON and images, so you can follow a member's data from the request through to the card in Designer.